|
|
Joined: Jul 2012
Posts: 15
Member
|
|
Member
Joined: Jul 2012
Posts: 15 |
I there a trick or technique to cutting this, either with a chisel or power tools? This is the only picture I have of the joint in question. 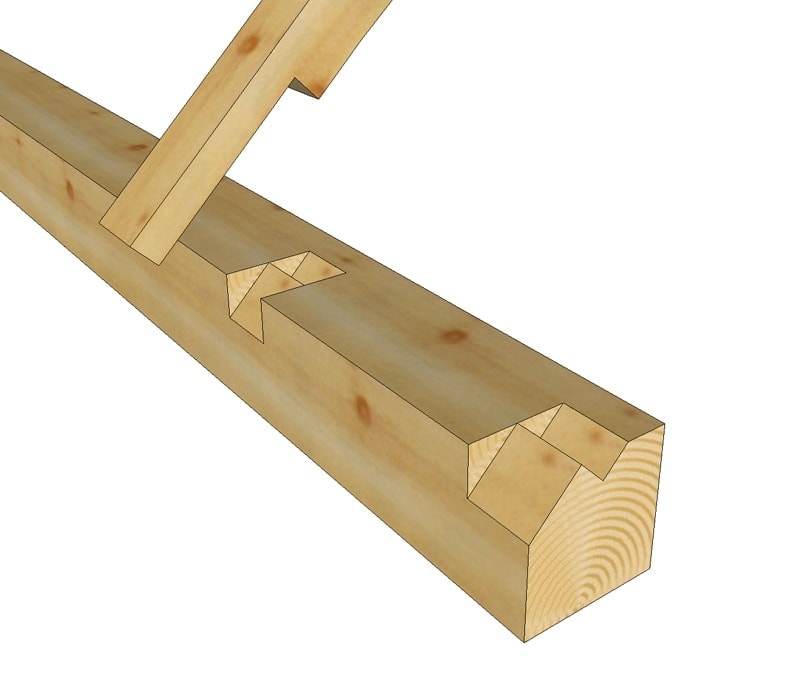 What I'm wondering is, on a say 8:12 roof, the inside of the joint would have to be cut at a 33.69 degree angle. Is there a tool that is used for this, or do some people cut a guide block? Thanks
|
|
|
|
|
Joined: Feb 2006
Posts: 718
Member
|
|
Member
Joined: Feb 2006
Posts: 718 |
You have to come up with the dimensions by laying out the joint on the face of the plate. Then you use a combo square to test the joint. I will try to post a better reply when I'm not on my stoopid phone. It is not difficult once you know how.
Member, Timber Framers Guild
|
|
|
|
|
Joined: Mar 2002
Posts: 1,696
Member
|
|
Member
Joined: Mar 2002
Posts: 1,696 |
When I was taught how to cut a step lap rafter seat, I was told to first layout the seat as if it was a 12/12 pitch. Then when you change the pitch to 8/12 the lines will move back away from the eave edge of the timber.
To layout a seat you use your framing square and a set of stair buttons.
Do you have any?
The picture you posted, I created.
I can create one for you at 8x12 pitch and or make a measured drawing of the distances of the of each of the cuts.
But I can't do it until the end of the week, as I am away from home on a job.
It isn't difficult once you have the button. They attach to your framing square and make it easier to layout this join.
One of the first things you need to tell us, and understand is that the thickness of the tail that laps over the plate is usually the same depth as the step.
The two most common are 2x2 or 1 1/2 x 1 1/2.
Which do you intend to use to make the 8x12 pitch?
Jim Rogers
Whatever you do, have fun doing it!
|
|
|
|
|
Joined: Dec 2007
Posts: 1,882
Member
|
|
Member
Joined: Dec 2007
Posts: 1,882 |
Steve Chappel has a great chart in his Timber Framer's Workshop book Trigonometric Ratios pg. 211
under 8/12 pitch roof you will find the numbers .5547 under Sine and .8321 under cosine. You can figure the dimensions of the step lapped rafter seat with these numbers. The given will be the thickness of the rafter tail and the thicker section just before the tail with the adzed reduction. Play with the number. Test them and run them backward and forward to ensure they are right. Of note Sine=rise Cosine=run.
I like how under 12/12 you have the same number .7071, 9/12 you have .6 and .8 respectively. and 8/12 cosine is .8321 fun numbers and easy to remember. Just divide or multiple but your givens, rise or run.
|
|
|
|
|
Joined: Jul 2012
Posts: 15
Member
|
|
Member
Joined: Jul 2012
Posts: 15 |
Thanks for the help from all of you.
I have stair gauges, and I can do the layout (I think). I'm a Licensed General Building Contractor, so rafter layout is familiar to me. I assume I would use basically standard layout techniques.
I'm intending to move into more traditional building styles, and am planning on starting maybe with a Jack Sobon style shed. I'm not a master with a chisel, however.
What I'm a little unsure about is how to cut the inside "notch" portion, and maintain the proper angle. I practiced on a scrap piece of timber I had, and my angle was a bit....uh....off.
Last edited by ATC; 05/27/14 06:39 PM.
|
|
|
|
|
Joined: Oct 1999
Posts: 463
Member
|
|
Member
Joined: Oct 1999
Posts: 463 |
My suggestion is to first go simple with cutting and once you get the knack then look for improved approaches. First forget about precise angular descriptions. Look at the rafter, note that: tail is reduced parallel to rafter slope, a cog abutment is at right angle to slope and full dimension rafter beds at slope. So a simple cutting scheme requires a control from slope and cuts square and parallel to control.
So begin with cutting the bed for the rafter tail, you will need a handsaw, chisel, hatchet, slick and combination square. Working to the lines, saw to the shoulders, then chip out waste, and smooth the bed, all the while retaining sharply laid out lines. The next cuts can be controlled with the combo square working against the tail bed.
You will quickly gain the feel of the shape
|
|
|
|
|
Joined: Dec 2007
Posts: 1,882
Member
|
|
Member
Joined: Dec 2007
Posts: 1,882 |
I have drilled holes in the deep parts of the step, 3/4" on each end.
|
|
|
|
|
Joined: Nov 2003
Posts: 687
Member
|
|
Member
Joined: Nov 2003
Posts: 687 |
This is such a cool joint. The inboard vee notch is generally entirely cut with chisel and mallet. As mentioned, cut the lap first to give yourself a reference for your combo square to check the progress on the chopping of the step notch. Stringy, tenacious wood and dry wood is not your friend for this type of work.
Because it resists efficient cutting with power tools it is seen only very rarely in new construction. There are a handful of framers who use it still, but it is pretty much not used in the timber frame industry.
|
|
|
|
|
Joined: Nov 2006
Posts: 850
Member
|
|
Member
Joined: Nov 2006
Posts: 850 |
Is this joint's presence in areas with no wind? I imagine a builder would go through this because no spike is necessary.
|
|
|
|
|
Joined: Jul 2012
Posts: 15
Member
|
|
Member
Joined: Jul 2012
Posts: 15 |
There are a handful of framers who use it still, but it is pretty much not used in the timber frame industry. Yeah, I was talking to a Timber-Framer buddy a while back, and he was saying that no one makes those anymore. They just cut a standard birds-mouth, and run a TimberLok down through the top plate.  I'm trying to go a bit more traditional. I know there are other rafter-to-top plate joints, but I don't know of any that allow you to continue the rafter for the rafter tail. As far as wind loading, when I go to build a house, I'll have it engineered. I don't know if a wood peg would suffice, or if you'd be required to use a Simpson type hurricane tie. Anyone else have experience with that?
|
|
|
|
|
Joined: Feb 2006
Posts: 718
Member
|
|
Member
Joined: Feb 2006
Posts: 718 |
I like step laps. They aren't too bad to cut when you've done a few. I don't know if code would require a clip or not. The last building I did I used a 6" HeadLok on each rafter.
Member, Timber Framers Guild
|
|
|
|
|
Joined: Nov 2003
Posts: 687
Member
|
|
Member
Joined: Nov 2003
Posts: 687 |
There are a handful of framers who use it still, but it is pretty much not used in the timber frame industry. Yeah, I was talking to a Timber-Framer buddy a while back, and he was saying that no one makes those anymore. They just cut a standard birds-mouth, and run a TimberLok down through the top plate. I'm trying to go a bit more traditional. I know there are other rafter-to-top plate joints, but I don't know of any that allow you to continue the rafter for the rafter tail. As far as wind loading, when I go to build a house, I'll have it engineered. I don't know if a wood peg would suffice, or if you'd be required to use a Simpson type hurricane tie. Anyone else have experience with that? No worries -- if you have the time and the will then go for it. Like I said, step laps are good joints. I hope it doesn't sound like I'm trying to pick a fight or talk you out of something -- I'm not. As a timber frame business owner and our company's designer, I'm constantly making decisions like birdsmouth over step lap. Which is better? Which is faster (cheaper)? How much better/faster? Is the extra 5,10,30,60 man hours in the frame worth it to the customer? Will they pay it? Should they have to? How much better will their home or barn be if we use this joint over that one? Riven pegs over sawn or turned? These are tough questions to answer decisively. They are complicated by the financial dimension to the calculus. We each get to decide our perspective on this - what we value -- and use that to decide where the line is between cutting a corner and being efficient. That line isn't in the same place for everyone and I like that -- it keeps me thinking about it. Enough philosophy- As for uplift, you probably won't need a simpson tie -- but a wood peg may not do it. I've seen square pegs used in old barns to try to add withdrawal resistance. A headed structural timber screw like Dave mentioned has always worked for us and may be a good compromise. We've never had to put hurricane clips on any common rafter in up to 130 MPH wind zones. But YMMV depending on your engineer and the details of the frame and enclosure.
Last edited by Gabel; 05/29/14 03:07 PM.
|
|
|
|
|
Joined: Nov 2005
Posts: 305
Member
|
|
Member
Joined: Nov 2005
Posts: 305 |
I do them a bunch (or my guys do them now), but as Gabel mentioned there's definitely some time in them.
Around here, you see them a lot, with a square peg in a round hole (traditionally). A structural screw is the modern alternative, and is easy, cheap, and makes everyone happy. There's even a code-approved alternative to hurricane clips for stick rafters from Fastenmaster--a Timberlok up from the bottom side of the plate into the rafter.
As far as cutting them goes, it's a lot easier to describe in a demonstration, but...figure the lines for the step and the lap, either with math, or a framing square. Saw and chisel the lap part, trying not to undercut it. Stand on the inside of the plate, hold the chisel vertically (not straight up and down, just the opposite of horizontally), tilt it to the roof pitch by aligning the top edge of the chisel with the lap below. That scores the end grain of the step. Repeat on the other side of the step, chisel the waste out in the middle. Keep doing that and then start checking for square and depth with a combo square off of the lap. I don't know if that makes sense, but that's the quick description.
|
|
|
|
|
Joined: Mar 2002
Posts: 1,696
Member
|
|
Member
Joined: Mar 2002
Posts: 1,696 |
This is a sample one I just made the other day at a workshop in Nebraska: 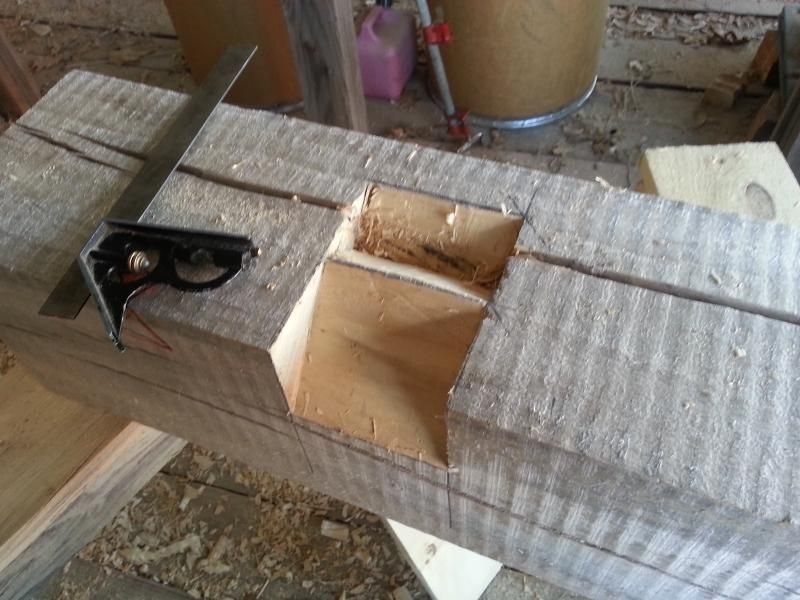 4" wide and 12/12 roof pitch. Here is how I check my work: 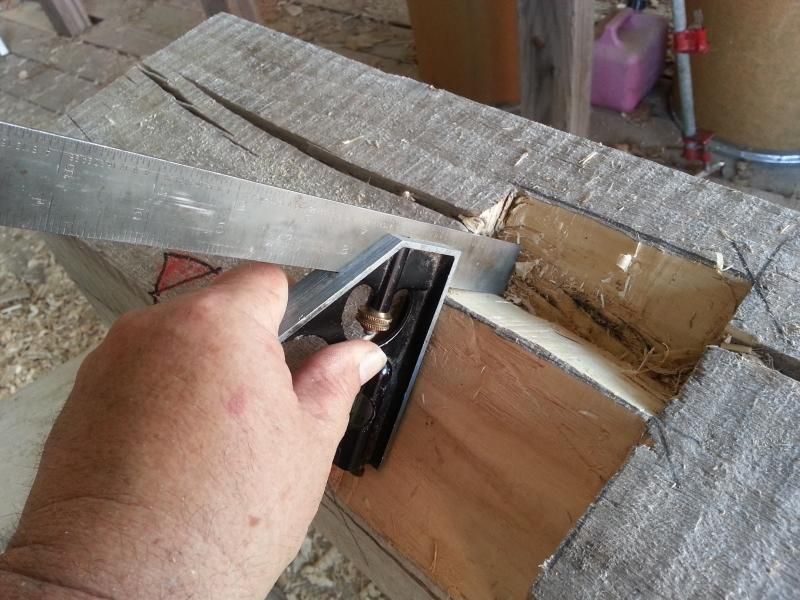 Hope that helps. Jim Rogers
Whatever you do, have fun doing it!
|
|
|
|
|
Joined: Mar 2002
Posts: 1,696
Member
|
|
Member
Joined: Mar 2002
Posts: 1,696 |
When we cut these for a project in Atlanta we used a small trim saw to cut the center line of the step to allow the wood to be removed: 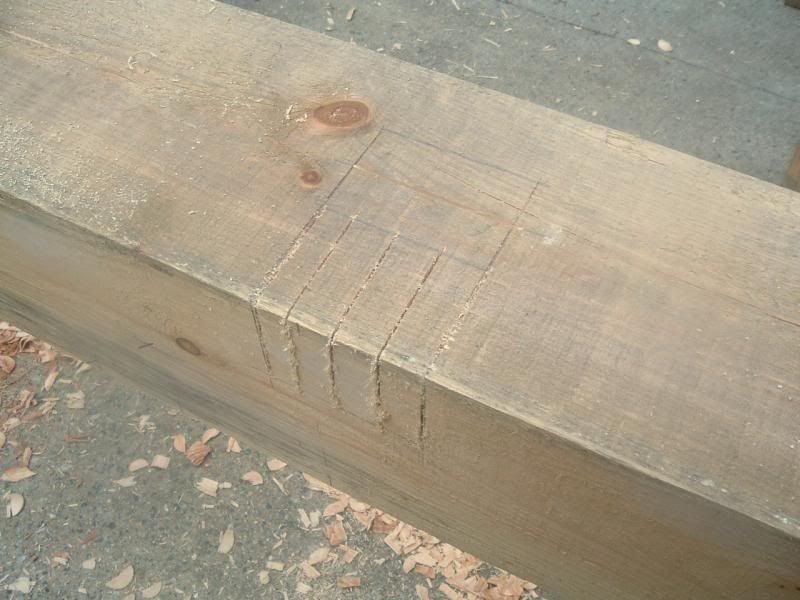 As well as cutting relief cuts for the lap section. Jim Rogers
Whatever you do, have fun doing it!
|
|
|
|
|
Joined: Jul 2012
Posts: 15
Member
|
|
Member
Joined: Jul 2012
Posts: 15 |
I hope it doesn't sound like I'm trying to pick a fight or talk you out of something -- I'm not. As a timber frame business owner and our company's designer, I'm constantly making decisions like birdsmouth over step lap. Which is better? Which is faster (cheaper)? How much better/faster? Is the extra 5,10,30,60 man hours in the frame worth it to the customer? Will they pay it? Should they have to? How much better will their home or barn be if we use this joint over that one? Riven pegs over sawn or turned? These are tough questions to answer decisively. They are complicated by the financial dimension to the calculus. We each get to decide our perspective on this - what we value -- and use that to decide where the line is between cutting a corner and being efficient. That line isn't in the same place for everyone and I like that -- it keeps me thinking about it.
Enough philosophy-
As for uplift, you probably won't need a simpson tie -- but a wood peg may not do it. I've seen square pegs used in old barns to try to add withdrawal resistance. A headed structural timber screw like Dave mentioned has always worked for us and may be a good compromise. We've never had to put hurricane clips on any common rafter in up to 130 MPH wind zones. But YMMV depending on your engineer and the details of the frame and enclosure. I didn't take it that way at all. One of my favorite past-times is philosophizing about construction. I appreciate all the help I've gotten. I'll just keep practicing on that joint.
|
|
|
|
|
Joined: Jul 2012
Posts: 15
Member
|
|
Member
Joined: Jul 2012
Posts: 15 |
Jim, Thanks for the pics. Are those substantially more difficult if the pitch is other than 12/12?
Also, where do you do workshops? Have you ever done one in Northern California?
|
|
|
|
|
Joined: Feb 2006
Posts: 718
Member
|
|
Member
Joined: Feb 2006
Posts: 718 |
Jack Sobon mentions in his first book that the joint works well down to an 8/12 roof. I used it on a couple of 6/12 roofs, and you have to invade the inside arris of the plate. I don't think it is any different to cut at the lower pitches. For the record, one 6/12 roof was a shed off of a 12'x16' Dutch house. That looked good. They other is an 8'x8' shed. I think the roof looks too flat.
Member, Timber Framers Guild
|
|
|
|
|
Joined: Dec 2007
Posts: 1,882
Member
|
|
Member
Joined: Dec 2007
Posts: 1,882 |
Dave, just cut a 16" wide plate. 
|
|
|
|
|
Joined: May 2002
Posts: 447
Member
|
|
Member
Joined: May 2002
Posts: 447 |
Though I'm here in the heart of historical Common Purlin land, I've cut plenty of these over the years (one even right on the coast - Pancake head structural screws) and have always seen the advantage being the self defining geometry - (as opposed to simple bird's mouths) When the step goes home the whole of the rafter is where it belongs.
And I've never seen them as all that hard to cut, (85% of the waste in both the step and the lap is best removed with an ax) even when controlling and truing the geometry with datum based layout - Yes you can place these precisely in even the wonkiest full length plates.
|
|
|
|
|
Joined: Mar 2002
Posts: 1,696
Member
|
|
Member
Joined: Mar 2002
Posts: 1,696 |
Also, where do you do workshops? Have you ever done one in Northern California?
No, but if you want to host one, I'm willing to travel out there and teach you, all. Are those substantially more difficult if the pitch is other than 12/12? I haven't personally cut one other than 12/12 but I was shown how to do it, once. Jim Rogers
Whatever you do, have fun doing it!
|
|
|
|
|
Joined: Oct 2002
Posts: 209
Member
|
|
Member
Joined: Oct 2002
Posts: 209 |
Regarding the step-lap versus simple birdsmouth question:
the step-lap is meant to resist rafter thrust; if there's no thrust, no need to use it and a simple birdsmouth will suffice. I think you would rarely find step-laps in buildings with purlin plates, for example, traditionally. It could be argued, though, that with shrinkage there could be the potential of thrust at the rafter foot, however small. So a step-lap would be a preferable joint at the wall plate.
|
|
|
|
|
Joined: Nov 2005
Posts: 305
Member
|
|
Member
Joined: Nov 2005
Posts: 305 |
A client of mine who is cutting his own frame asked for a step lap review. So I took some pics of the different methods. His rafter tail and step are both 2" thick. If it was 1.5", then you would use the tongue of the framing square. If it was 3.75" (for some reason), then you could rip a board and hold it alongside the square at the right pitch. So I showed him 3 ways to figure out how to lay out the joint. Method 1, and perhaps the easiest. You just need a framing square for this. Draw a perpendicular line somewhere on some lumber. If the tail is 2" thick then use the blade (the wider side) of the square. The roof pitch on this barn is 9:12. So hold 9:12 on the square, with the 9 on the edge of the timber at the line. Draw a line where it intersects the perpendicular line: 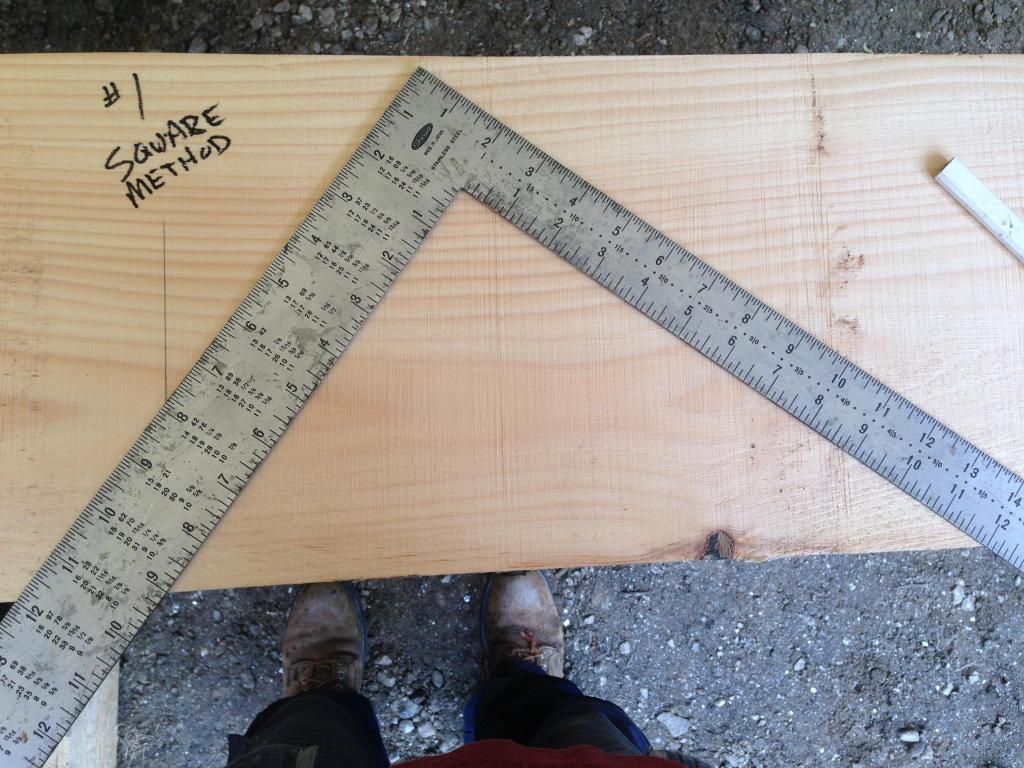 Then repeat with the blade of the square putting 12 on the corner. 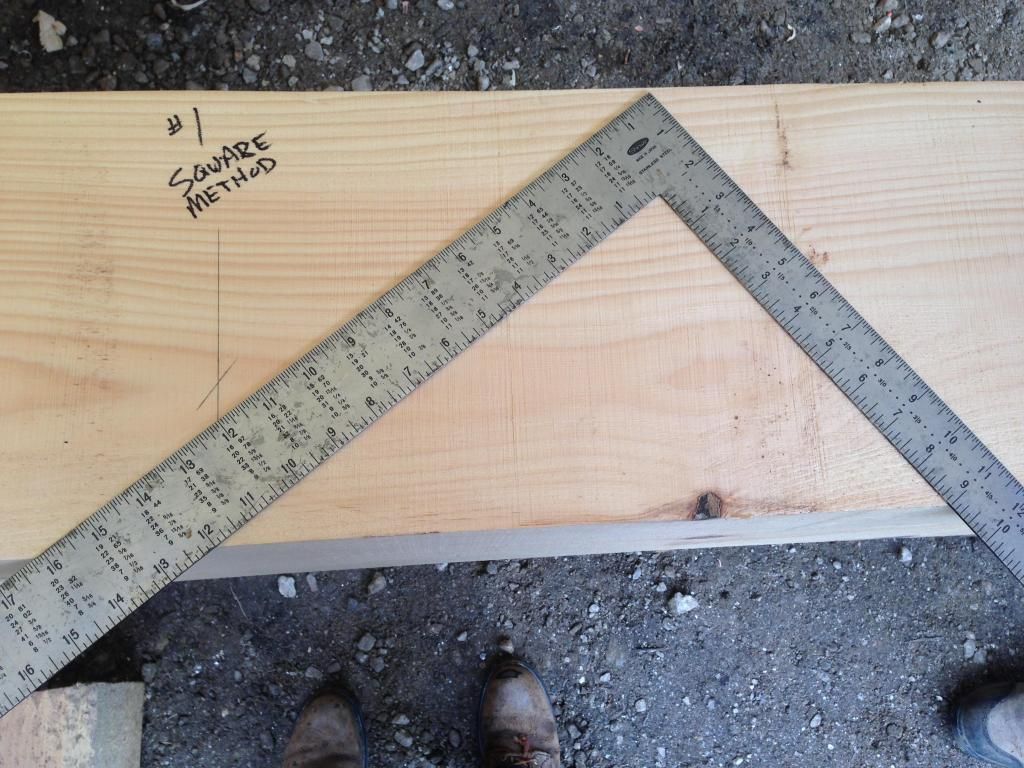 Those 2 intersections give you the horizontal and vertical widths for the step lap. Now you just have to figure out which one to apply where. 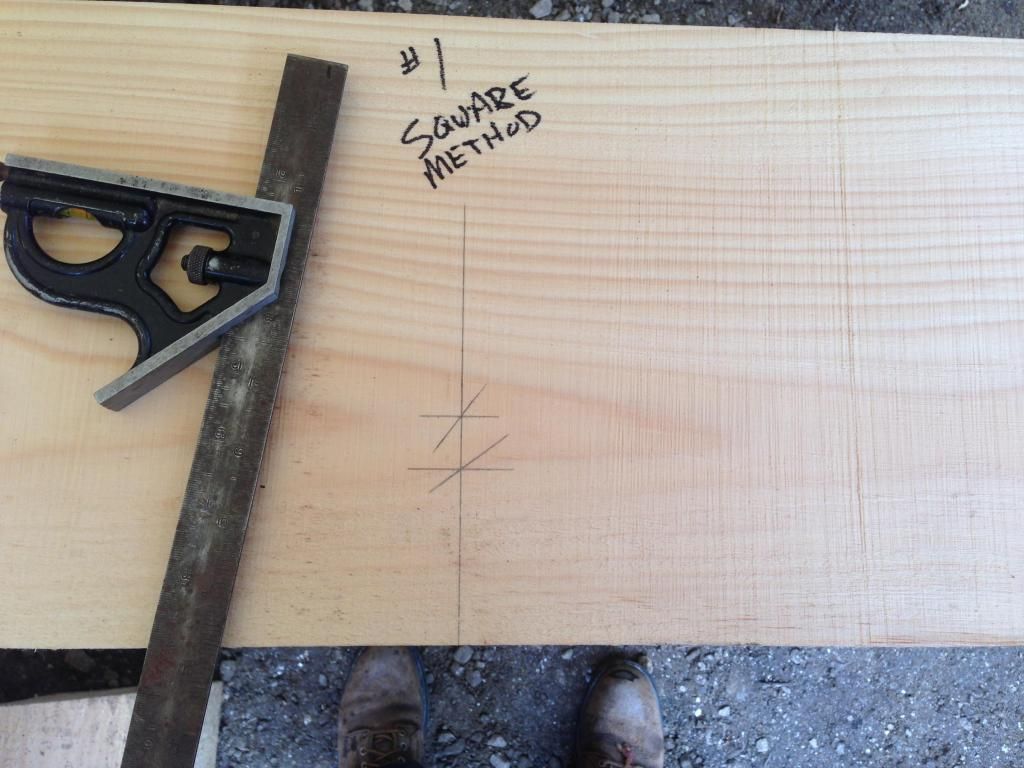 At 12:12, the vertical and horizontal would be the same, right. So if the roof pitch is less than 12:12, as it is here, then the horizontal distance should be greater than vertical distance. 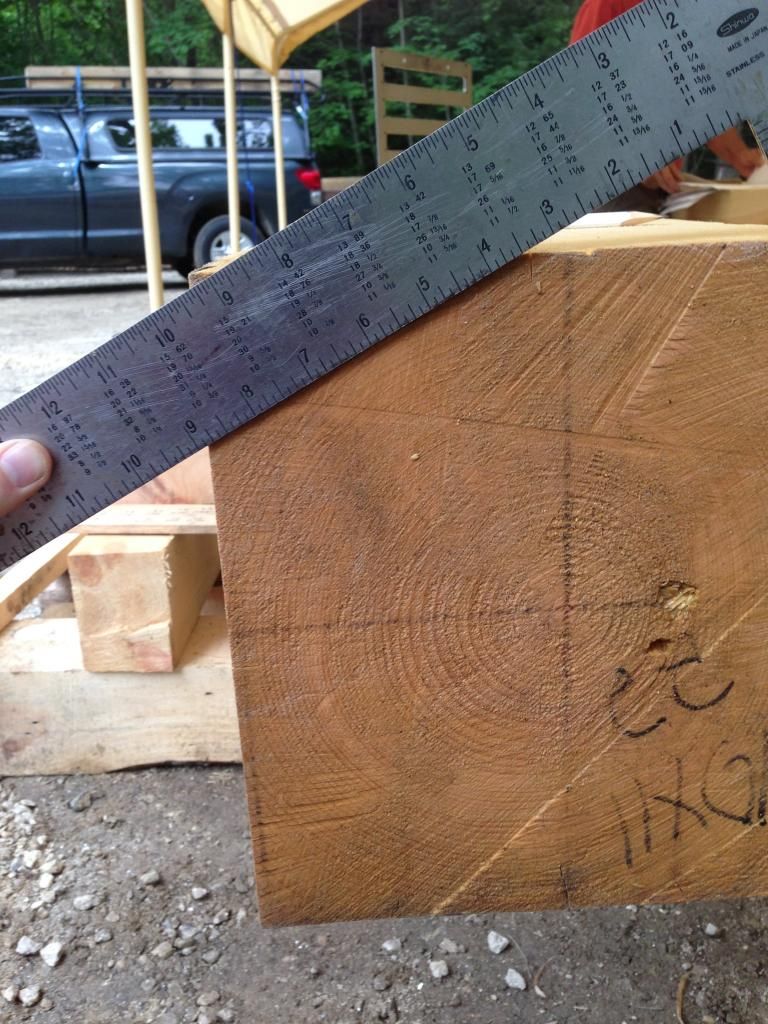 Continued in the next post... www.uncarvedblockinc.com
Last edited by timberwrestler; 07/22/14 01:32 PM.
|
|
|
|
|
Joined: Nov 2005
Posts: 305
Member
|
|
Member
Joined: Nov 2005
Posts: 305 |
OK, here's method 2. This method is also pretty easy, and is especially easy with a 9:12. This method uses similar triangles. 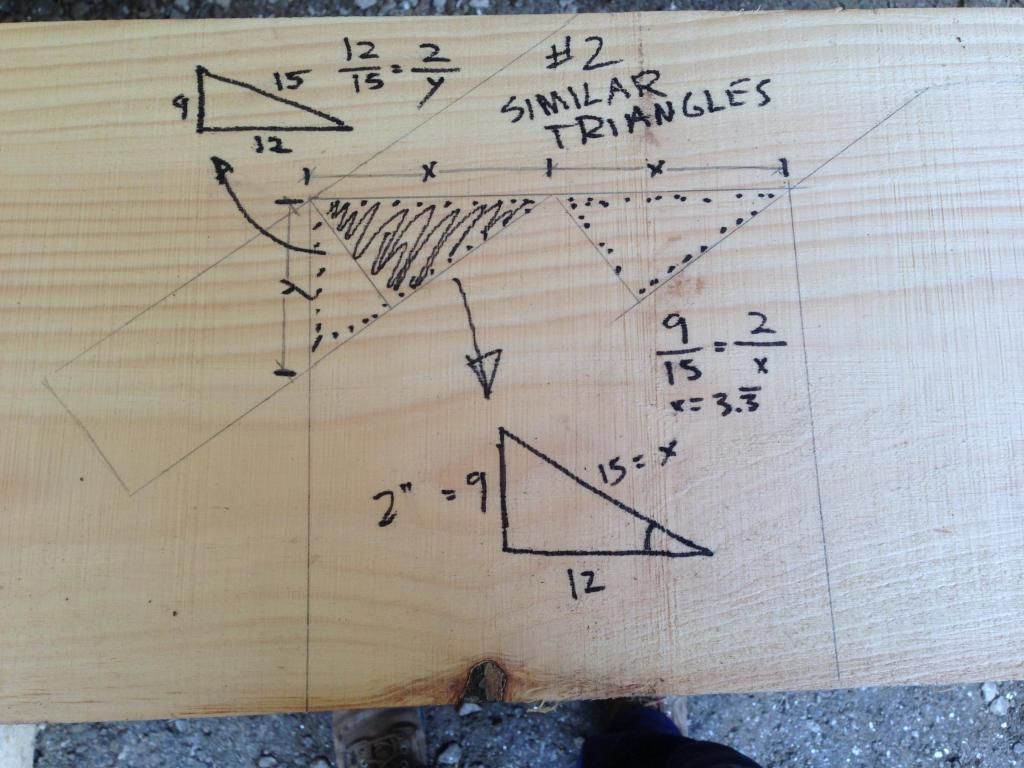 It helps to draw a little cross section of the plate (this one is by no means to scale. There's a bunch of triangles in there, and if you can solve for some unknowns, then you can get all of the numbers that you need. You'll need the diagonal or hypotenuse of the roof pitch triangle. The rise is 9, the run is 12 (or maybe 10 if you're in Europe or Japan), so in this case the diagonal (also called the rafter length) is conveniently 15. It's a 3/4/5 triangle. If it's not, then you can use the Pythagorean theorem to solve for it. You want to know 'x' in the drawing, which is equivalent to the hypotenuse, or 15. We know the rise of that shaded triangle, as it's 2", which is equivalent to the rise of the roof pitch (9). Cross muliply, you get 3.33 You want to solve for 'y', which is our vertical drop, that's also equivalent to the hypotenuse (15). This time our known value is the base of that triangle, which is 2", the same as our 12. Cross multiply, you get 2.5". These numbers can be checked with another one of the methods. www.uncarvedblockinc.com
|
|
|
|
|
Joined: Nov 2005
Posts: 305
Member
|
|
Member
Joined: Nov 2005
Posts: 305 |
OK, here's method 2. This method is also pretty easy, and is especially easy with a 9:12. This method uses similar triangles. It helps to draw a little cross section of the plate (this one is by no means to scale. There's a bunch of triangles in there, and if you can solve for some unknowns, then you can get all of the numbers that you need. You'll need the diagonal or hypotenuse of the roof pitch triangle. The rise is 9, the run is 12 (or maybe 10 if you're in Europe or Japan), so in this case the diagonal (also called the rafter length) is conveniently 15. It's a 3/4/5 triangle. If it's not, then you can use the Pythagorean theorem to solve for it. You want to know 'x' in the drawing, which is equivalent to the hypotenuse, or 15. We know the rise of that shaded triangle, as it's 2", which is equivalent to the rise of the roof pitch (9). Cross muliply, you get 3.33 You want to solve for 'y', which is our vertical drop, that's also equivalent to the hypotenuse (15). This time our known value is the base of that triangle, which is 2", the same as our 12. Cross multiply, you get 2.5". These numbers can be checked with another one of the methods. More coming. www.uncarvedblockinc.com
|
|
|
|
|
Joined: Nov 2005
Posts: 305
Member
|
|
Member
Joined: Nov 2005
Posts: 305 |
Method 3: Trig I'm not going to elaborate on this one much. Draw same triangles, find pitch angle, find known values, solve for unknowns. 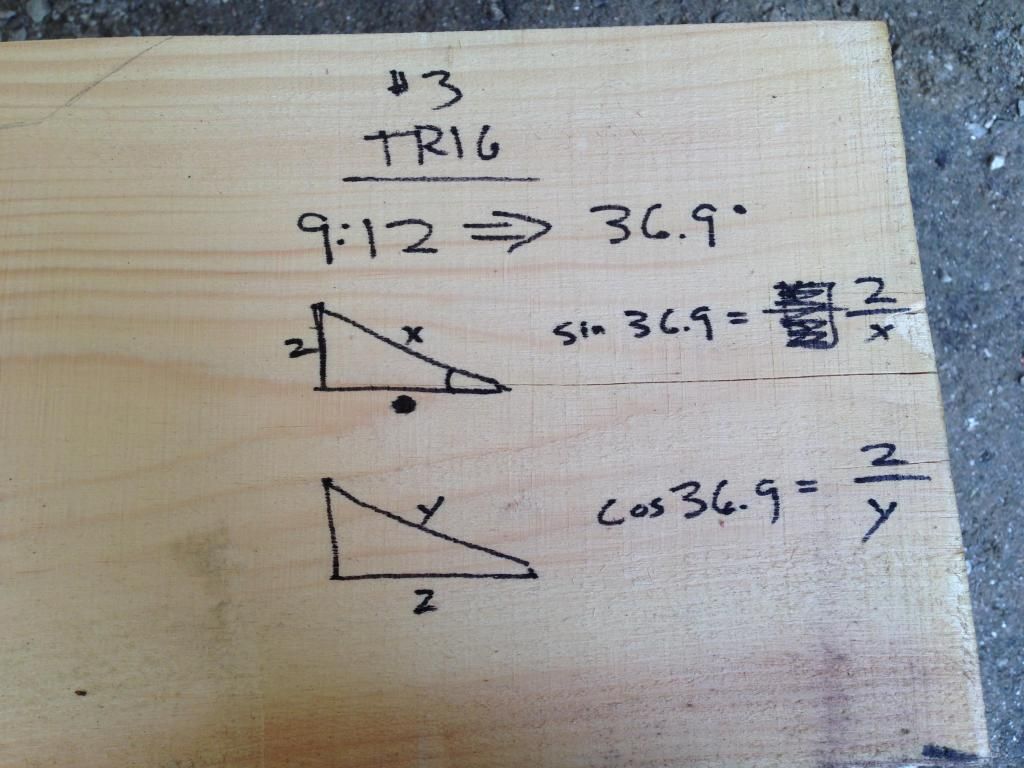
|
|
|
|
|
Joined: Nov 2005
Posts: 305
Member
|
|
Member
Joined: Nov 2005
Posts: 305 |
That gives us something like this: 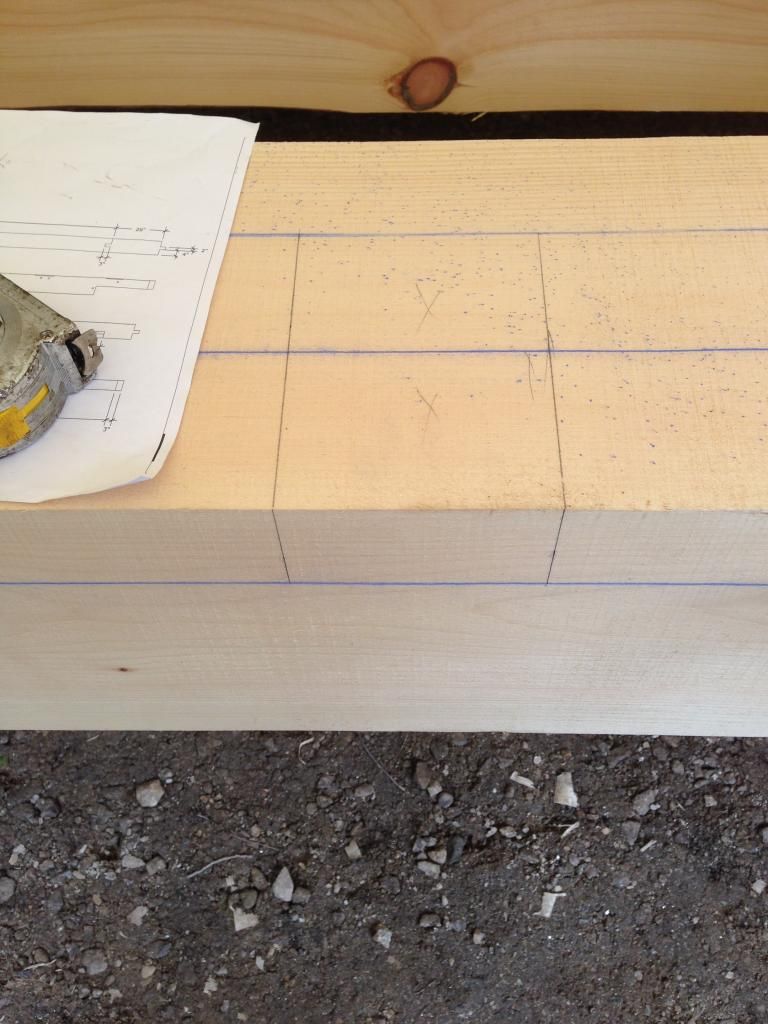 So I snapped lines instead of using a combo square, because the piece had a little bow in it, and sometimes it's just easier. Saw the diagonal rafter tail portion (or axe it as Will mentioned). 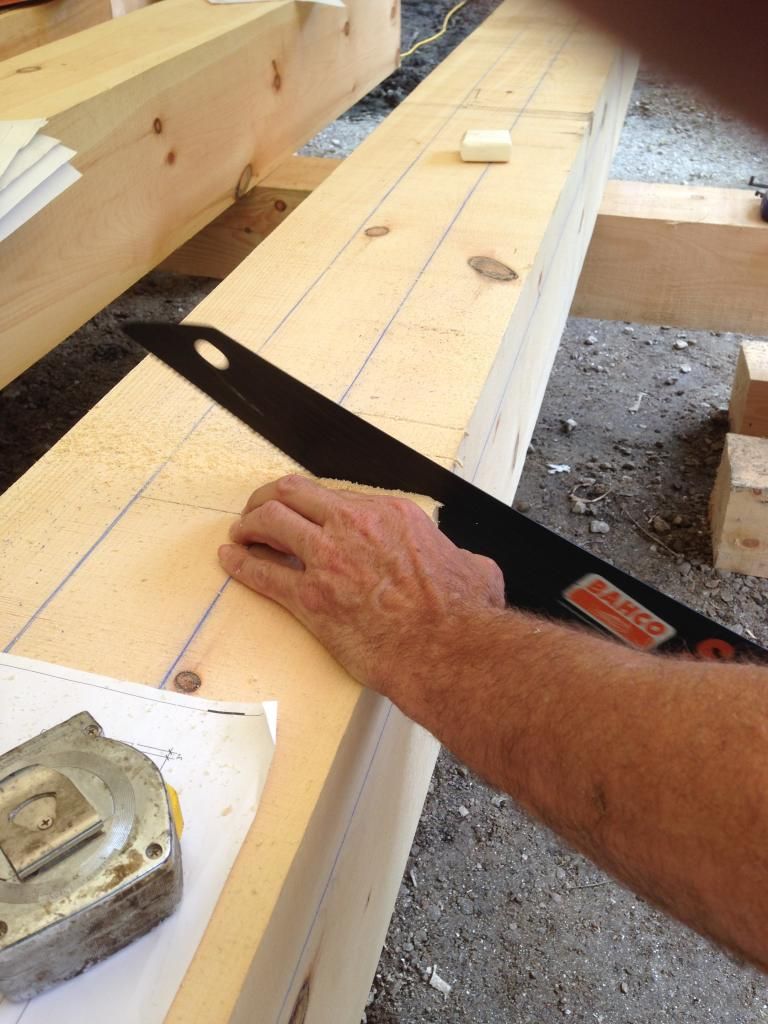 Clean it up with a chisel or something. Ideally, try to not dish the surface out, because the next part is referenced off that surface. 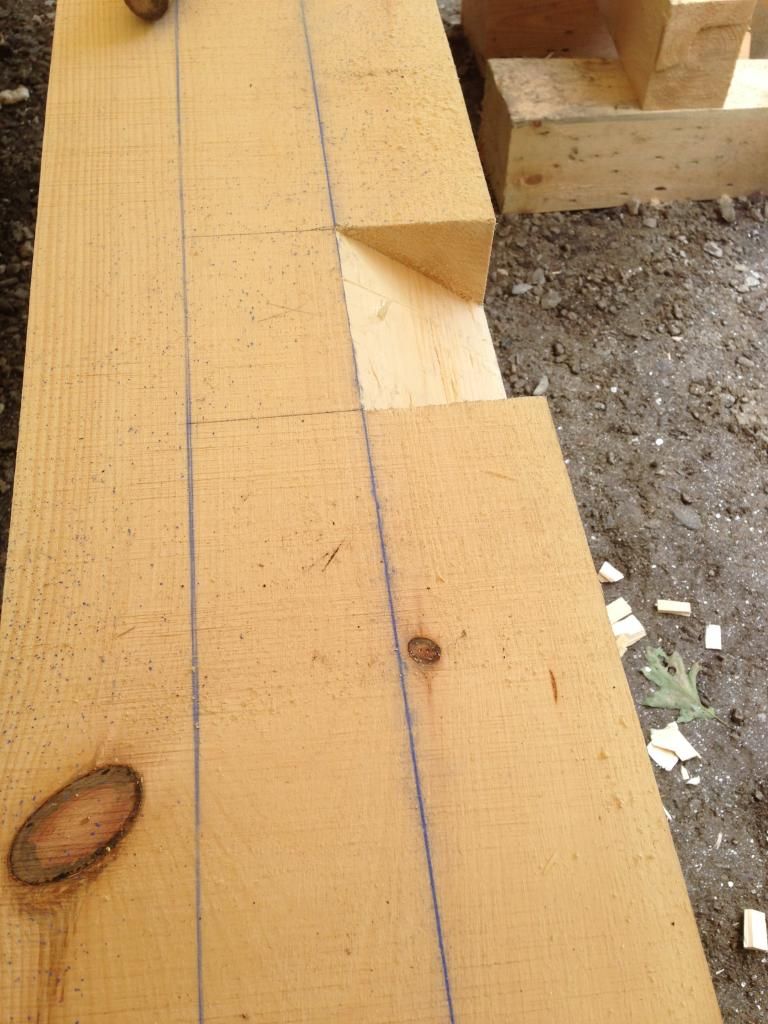 The next part is the way that I was taught, and it makes sense to me. I've tried to think of an easier way to do this, but haven't yet. So, holding chisel vertical, put corner of chisel somewhere around middle of step part, line up the top of chisel parallel to the surface below (because they're in the same plane). Keep the chisel maybe 1/4" in from the line, because it's going to want to wander. 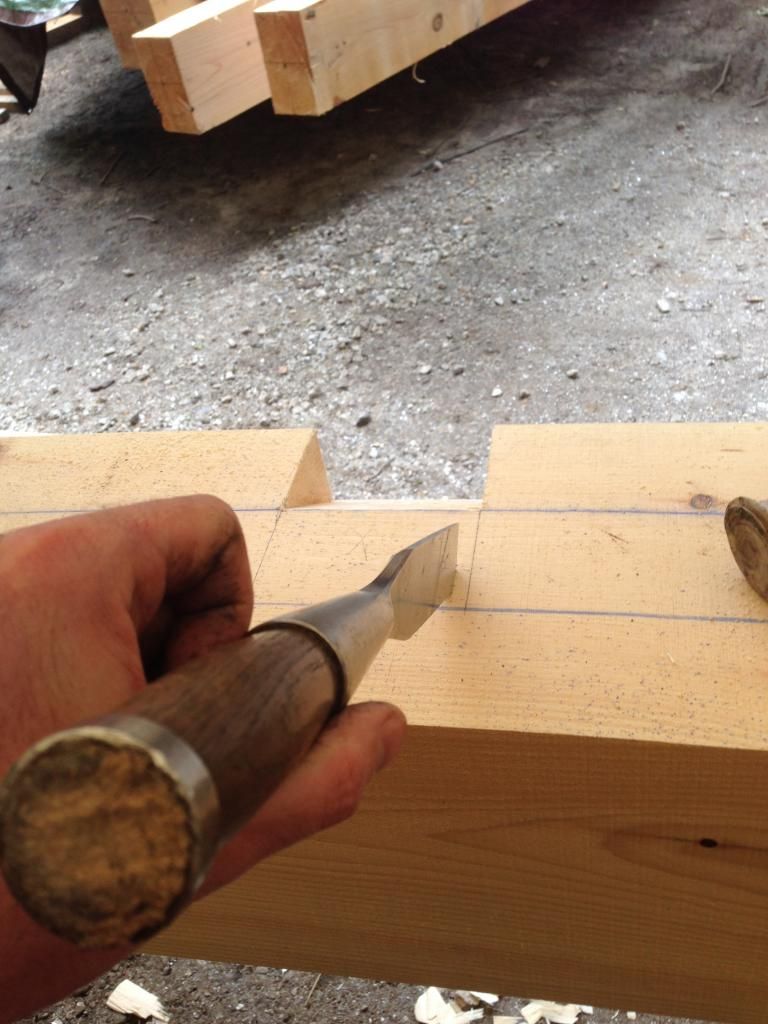 Do the same on the other side (you're severing the end grain), then chisel out waste in middle. Repeat repeat. 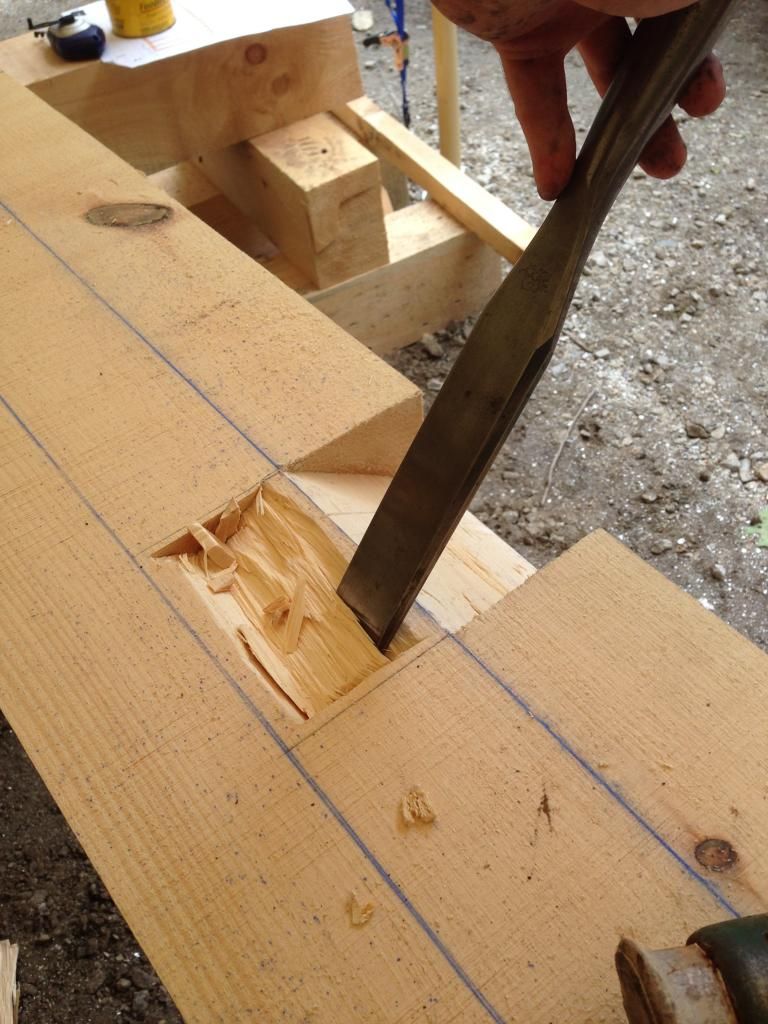 Be careful as you don't want to undercut the triangle that's left in the middle. As you start to get closer, you can set a combo square a little less than what you want (less than 2"), to check for perpedicular off the rafter tail cut. Pare and chop till you get it right on. www.uncarvedblockinc.com
|
|
|
|
|
Joined: Jan 2008
Posts: 918
Member
|
|
Member
Joined: Jan 2008
Posts: 918 |
nice reply, thanks for sharing the pics and the process...!
|
|
|
|
|
Joined: Jun 2015
Posts: 1
Member
|
|
Member
Joined: Jun 2015
Posts: 1 |
I know by now this is a really old thread, I came upon it while I was trying to remember how I laid out and cut the step laps for my barn. The layout didn't seem especially difficult but like everyone else I never found a way to make the cuts with power tools. I had 68 joints to cut and made it a sport to cut them quickly and accurately. The best way I found to cut them was to start as suggested earlier, but with a variation for the pocket.
Saw the shoulder of the seat with a good hand saw and chisel out in between.
Now, don't go for your framing chisel. Get the corner chisel. Its amazing how good a corner chisel is for hogging out the bulk of material. Forget about the corners, it'll work fine but you don't really save that much time with a corner chisel there. Use whichever chisel you have in your hand for the corners. It's also good for any mortise that's not drilled first. Get a sturdy one and hit it hard and fast and don't worry about being nice to your chisel. Stay away from the lines as you can clean up better with a flat chisel.
Drink coffee, maybe more coffee.
You've got a long row of joints that are just alike so you don't have to rethink each one and you can make good time here.
Hope this is helpful and thanks to all for the tips!
Mark
|
|
|
|
|
Joined: Mar 2002
Posts: 1,696
Member
|
|
Member
Joined: Mar 2002
Posts: 1,696 |
Thanks for sharing your methods.
Jim Rogers
Whatever you do, have fun doing it!
|
|
|
|
|