Timber Framers Guild
Overhang
Posted By: mo
Overhang - 02/28/08 05:21 AM
I was wondering how you all think is the best way to have rafters overhang the eaves? It seems you cannot cut away enough to have the top of the rafter be flush with the top plate.
Can you have the height above plate a certain dimension to easily fill in the space when enclosing? If you want or have to use a rafter that sits proud of the plate (higher) what do you all do to fill in the void?
Thanks, Mo
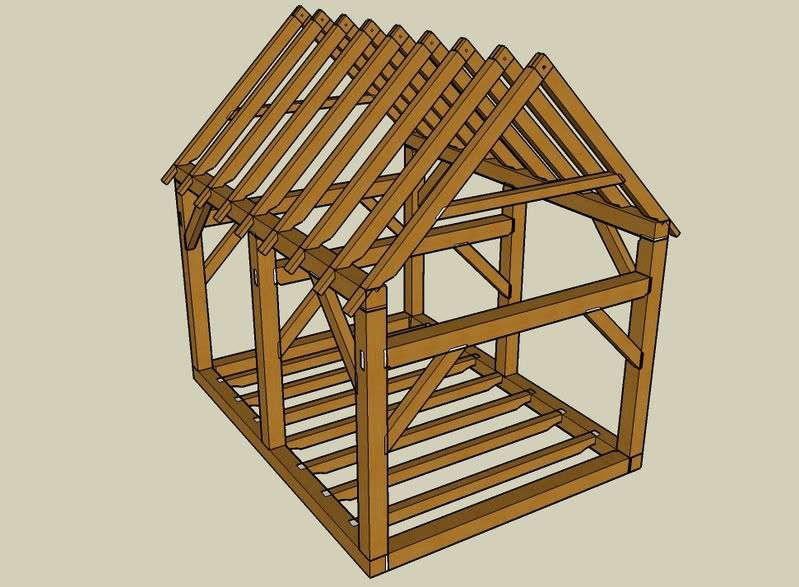
It is possible to have the top of rafter at the same elevation as the outside top corner of the top plate. The building below shows how:
Posted By: mo
Re: Overhang - 03/04/08 12:15 AM
Mark, thanks for the image. That makes sense.
What if you wanted the overhanging rafter to be taller than wide. I guess you could make the rafter bigger and gain back the same way?
What about creating a flare in the overhang where the pitch at the eaves is less than the main pitch. Anybody have ideas for this (When tight enclosure is neccessary)? I remember the sprocket and dont like that too much because they have to sit to the side. What about adding level timbers outside of the structure with bracing? If you wanted it on the Marks image. It seems you could raise the bents add the plate, add outside bracing, attach the connecting pieces with possibly a dovetail at the top plate. It seems you could do this in a principal rafter roof. You know what this babbling gets confusing. Here:


Now I tend to design stuff without looking at certain factors sometime. I.E. stability, raising capability. However I think this is possible. If you all would like too, please take shots at it, compliment, or whatever. I like different opinions. It seems like that enclosing thing is always in the way.
From a design point of view, it seems the overhang is a distinct element of overall style.
mo
looks like a quebecois roof, with the kick out at the bottom. also looks like a bunch of work, fine for your own project.....
Posted By: TIMBEAL
Re: Overhang - 03/04/08 11:44 AM
Mo, if you could find a client that would go for it why not. Is this a principal rafter, common purlin roof? Also, I have always put the wedge in from the outside, on the wedged half dove tail, I think it has a tendency to ride up with it going the way you have it drawn, from the inside.
Posted By: Gabel
Re: Overhang - 03/04/08 01:04 PM
With the wedge on the inside like that you can tighten it back up over time and shrinkage pretty easily as long as your wedge isn't too long.
Posted By: Joe Bartok
Re: Overhang - 03/04/08 01:23 PM
We make the overhangs similar to that shown in MO's drawing. The overhang (four feet is typical) is actually created by tie beams and instead of braces sections of log, of gradually increasing length, are scribed into the courses to create a corbel. An "outrigger" runs parallel to the plate wall.
Posted By: TIMBEAL
Re: Overhang - 03/04/08 11:49 PM
I was wondering about "out riggers". You must be using a purlin system. I am still under the assumption the wedge goes in from the outside, traditionally. Setting the wedge after the floor goes down will still be tricky. How about using a tie at the plate to generate the over hang. Than you won't have the silly wedge. Seems like a lot less work. Tim
I agree with the idea of running the tie right out. Will be stronger and less work. A couple thing to consider depending on your inclosure system and your location:
1. It will be harder to close the structure with a changing roof pitch
2. depending on how far north you are the part of the roof that is not seated directly on the house (overhang up to where the pitch changes) will be cooler than the rest of the roof. This can cause icing and a leaky roof. The ice forms on the overhang and slowly pushes the shigles up.... you will need to use ice guard.
Where is Charlestowne? I believe you said you were in the huricaine belt... so this won't apply..... but strength of the overhang sure will!!
Carlos
P.S. Does look rather quebecois, however their pitch change is more of a curve...
Posted By: studio
Re: Overhang - 03/05/08 09:32 PM
Actually, for northern climates it is a warmer roof that typically causes the snow to melt and re-freeze creating ice dam problems. Quite often this can be traced to poor insulation details or installation. A cool roof actually helps prevents the snow from thawing, and therefore prevents the ice dams.
Actually, for northern climates it is a warmer roof that typically causes the snow to melt and re-freeze creating ice dam problems. Quite often this can be traced to poor insulation details or installation. A cool roof actually helps prevents the snow from thawing, and therefore prevents the ice dams.
That's exactly what I was saying. The warmer part melts the snow... it runs down on to the cooler part... refreezes and Voila.... ice dam
Posted By: mo
Re: Overhang - 03/06/08 01:09 AM
I have no problem with harder or lots of work if it is worth it in the end. That is the question that I would ask myself. Not if it is too much work or it is hard to figure.
The tie at the plate does make sense. There seems to be some variations to that. Anyone with one in mind, with pencil and paper? I was trying to think of a way with the dropped tie because of the advantage of more livable space above the tie when it is dropped.
Thanks for the responses.
Carlos, Charleston is the lowcountry of South Carolina. Right on the Atlantic. Home of spanish moss, sweet tea, slight drawls, and "How you?"
Posted By: studio
Re: Overhang - 03/06/08 02:42 AM
Sorry, I misunderstood what you were saying but now I get it. However, if the roof is properly insulated/vented(venting depends on if it is a cold roof or warm roof system) there shouldn't be any melting occurring on the upper portion to run down and freeze.
Posted By: TIMBEAL
Re: Overhang - 03/06/08 10:43 AM
Mo, check out a reversed assembly of the english tying joint. This is where the tie sits on top of the post and the top plate is lapped onto the top of the tie, leaving you with a little more room. It seem like a good compromise. Tim
Posted By: Will Truax
Re: Overhang - 03/06/08 11:44 AM
Agreement from here, a Dovetail Tenon should be wedged from the inside (or how would maintenence be effected ?)
Here's a capable crew framing a roof system with a kicked overhang - Lots of work in it - Fancy for fancies sake is silly, but some things are just worth the doing !
http://www.youtube.com/watch?v=uFB4t-MAD_Y&NR=1
Mo, check out a reversed assembly of the english tying joint. This is where the tie sits on top of the post and the top plate is lapped onto the top of the tie, leaving you with a little more room. It seem like a good compromise. Tim
This post definately needs pictures!!!

Posted By: daiku
Re: Overhang - 03/06/08 03:30 PM
Very cool video. I have to figure out how to make those!
Posted By: Joe Bartok
Re: Overhang - 03/07/08 06:33 PM
The tie at the plate does make sense. There seems to be some variations to that. Anyone with one in mind, with pencil and paper? I was trying to think of a way with the dropped tie because of the advantage of more livable space above the tie when it is dropped.
Using the tie beam to create the overhang is illustrated by the
ILBA Logo. (Sorry, I lack the ambition to draw a picture ...

)
Posted By: TIMBEAL
Re: Overhang - 03/08/08 01:23 PM
Will that u-tube is quit a dance.
On page 7 of Historic American Timber Joinery. The yellow book, is a picture of a variation of a reversed assembly. Paul Oatman also documented some I can't place where I saw them maybe a copy of scantlings I don't know. Tim
Posted By: mo
Re: Overhang - 05/08/09 02:45 PM
back to the overhang.
Well I was designing an outdoor bar for a friend of mine. It is rectangular in plan and I wanted four hips to converge at a pin. With a bar he would naturally want an overhang.
This can get quite tricky.
Unequal pitches due to the rectangle will lead to some head scratching with an unequal overhang, and then some more headscratching with different common rafters for sufficient Height Above Plate.
The only method I have come up with is: try this, change that, then change that, oh damn, i gotta change that now. You get the picture.
Does anyone have a method that is not so back and forth? Stick framing example would be fine, or for that matter lets just make it lines. There must be a good order of steps.?!
Posted By: mo
Re: Overhang - 05/10/09 08:12 PM
does anybody know this conundrum?
Posted By: Kevin L
Re: Overhang - 05/10/09 11:53 PM
Learn a good cad program. Sketchup is a good start. It will allow the what if's and the how do I do that, without cutting the first piece and without wasting any time or money.
Posted By: bmike
Re: Overhang - 05/11/09 01:30 PM
does anybody know this conundrum?
yes, i know it well. but i try to work it out on the computer before sending it to the shop...

what are the:
building width
building length
pitch along width
pitch along length
(and if you don't know the pitches, what pitch are you targeting?)
i'll throw it into my roof module on HSB program and post a few images...
why not forget about the center pin and do 2 king post trusses, keeping the pitches the same, overhangs the same, etc.?
Mo,
I once asked a compagnon how they dealt with making equal overhangs on irregular roofs, and he said they just design the roof, and then move the walls to make equal overhangs. I like it--it's a simple approach when you're designing new stuff.
The other way is to to do a drawing to figure out how much to offset the hip or valley.
the wrestler
Posted By: bmike
Re: Overhang - 05/12/09 02:10 AM
its possible to solve this graphically. i just did a quick sketch - with a 12x24 plan you'll need a 9/12 on the long side and a 5.25/12 on the short side, assuming 2' overhangs all around.
this does not put your hip over the corner post - which may or may not work structurally.
you'll also need a tension connection to keep the corners from spreading away from each other - or build a truss into the center pin idea.
with the hip offset from the corners it might make sense to do this as a common purlin system on top of primary hips and a few primary rafters.
and you'll have an odd shaped boss pin as things don't hit at right angles to each other.
and if you plan to attach a gutter board, your plumb cuts on the ends of the rafters will be different from side to side - so you can design around this with a unique end detail.
Some of the software I've used permits, even encourages, a uniform elevation for the gutter line as a place to begin. Then locate the ridge and specify a single height. All else follows, almost magically.
While it must seem more difficult at first, I believe that there are fewer hoops to leap through if you force the hip to land on a building corner (yielding unequal pitches on adjacent roof planes) than going the other route.
Posted By: Will B
Re: Overhang - 05/12/09 01:30 PM
This topic is the subject of my next When Roofs Collide article in the June Timber Framing. With an irregular roof it's impossible to have the hip cross the corner of the building and have equal width and equal height overhangs, at least in my universe. You must offset the hip from the corner, and if there are irregular pitches, raise the plate on one wall or have different HAPs.
Posted By: Gabel
Re: Overhang - 05/12/09 01:31 PM
mo,
For a rectangular pyramidal hip roof with equal overhangs and a level fascia, you need to work from the gutter line
Start by drawing a line drawing in plan view. Remember to work from the gutter line. I add in the plates as a faint or dashed line just for reference at this point.
Usually I let the main pitch and the size of the building (including the OH's) determine the pitch of the adjacent side. Connect the corners and you have the hip lines. The hip line will not cross the corner of the plates as mike mentioned.
You will also want to shift the hip so the backing cut is not centered, but rather leaves equal depth on each face of the hip (you posted a graphical solution to this a while back that I still refer to).
Last thing you do to the plan drawing is add the jacks. If you use the same spacing on both sides, they will be staggered along the hip. alternatively , you can change the spacing to make them hit the hip in pairs.
To get the pitch of the adjacent side, determine total rise from gutter line to peak on the main side. Solve for pitch using total rise and adjacent run including OH.
Now you have everything you need except the HAPs. You have to choose one side's hap and let it dictate the other sides hap. It can be give and take between the two sides so that you don't take too much out of one or too little out of the other. I start by assigning the tallest HAP i can live with to the higher pitch side. then, using the runs of the jacks to the plate and the pitches, i see what that gives me for the shallow side. If it isn't too deep a notch out of it and I can come down a little, I may do that. The alternative for different HAPs is different plate heights, but that is a tough one to make look right in exposed framing. In stick framing it's common to raise the plate level on the steep side to make the HAPS the same.
One place to keep an eye on is the Hip where it crosses the plate(s) and forms the overhang. You will probably want to reduce it's depth after it crosses the plate line because you will be taking a good bit out of it to meet your two HAPs (assuming the hip is deeper than the jacks). this area can look funny if you aren't careful.
Sketchup is a good way to model this to avoid funny looking stuff.
Posted By: bmike
Re: Overhang - 05/12/09 01:44 PM
This topic is the subject of my next When Roofs Collide article in the June Timber Framing. With an irregular roof it's impossible to have the hip cross the corner of the building and have equal width and equal height overhangs, at least in my universe. You must offset the hip from the corner, and if there are irregular pitches, raise the plate on one wall or have different HAPs.
that is what i found in my sketch... no matter how you push, you'll end up with an offset hip from the corner, if you want irregular, you get, well, irregular.
Posted By: bmike
Re: Overhang - 05/12/09 01:47 PM
Sketchup is a good way to model this to avoid funny looking stuff.
sure is. a bit tricky to do compound stuff the first few times - but certainly manageable.
good post gabel. essentially what i did in the sketch, but i had the magic of HSB in the background to connect all the lines for me.
Posted By: mo
Re: Overhang - 05/13/09 03:14 PM
thanks for all the posts everyone.
Will, I look forward to reading the article. That reminds me of something....
Gabel, that is a good post. Thank you. The HAP stuff is kinda what I was talking about. Your info is helpful.
You guys are right about the building corner. As the discrepancy in pitches magnify the hip falls further and further from the building corner. It does sometimes look funny when it crosses a plate 1/2' from the corner!
I feel confident about doing all this with no overhang including irregular plans, different pitches and such. More tinkering is definetly involved with the overhang aesthetically and mechanically.
Back to the drawing board..... I might just have two trusses as bmike suggested, put a ridge in there, equal pitches, equal overhang, Voila! but is fun to mess around with it.
Posted By: bmike
Re: Overhang - 05/13/09 03:55 PM
mo -
while it will be a creative roof to get the plan and center pin to work, what i like about the 2 truss concept is that it really helps lessen the outward thrust on the corners. not something that can't be solved - but it is an elegant solution and will probably allow you to keep wood to wood joinery in all cases and not have to go with some hidden tension steel in the corners (or really long bypassing tenons - that could pose tricky.
the other nice thing about the 2 trusses is you have the option to get some bracing to a ridge to stiffen the roof laterally along its length. certainly a hipped roof triangulates along itself - but i've experience hipped roofs being a bit jiggly until the sheathing gets applied. adding a few braces can't hurt.
good luck, and my offer still stands. send me an email if you want me to take a peak at some sketches or want to see something dropped into sketchup or hsb.
-mike
Posted By: mo
Re: Overhang - 05/13/09 04:31 PM
hey mike, yes while I have been thinking in geometric design you have been thinking about it working. thank you. what you say makes good sense.
I appreciate you offer as well. I might be taking you up on it soon.
I have messed around a little. I took some advice on this thread and decided to build the roof first, then set the plates and posts. This one does not have an equal overhang but at least the hip falls in the corner (except for a little offset for an equal depth backing). This seems a little stronger than working with an equal overhang which then makes the hip fall out of the plates converging corner. Granted the plumb cuts of the rafter tails are different heights I guess you could leave fascia off or make the height of the fascia to the greatest plumb cut.
Ill try the equal overhang next.


p.s. Im trying to get all I can out of this software before a student license runs out. good stuff.
Posted By: bmike
Re: Overhang - 05/13/09 04:43 PM
mo -
looking good.
to solve the gutter board / plumb cut height issue you can always reduce the tail that protrudes beyond the plate. check out the old heartwood / sobon shed for how it might work. you can make a consistent height with 2 different details - and if you make this a feature and do some creative detailing it could be a nice addition.
the other option to consider, instead of a traditional king post truss, is a sloping rafter hipped truss.
here's a pic:


basically set up your hip and a rafter in line with it. this becomes the truss. the example is uber complicated... but the idea might work in your case, esp if you have straight bottom chords and king posts. (we added queen posts to help control the size of the curves)
-mike
Posted By: mo
Re: Overhang - 05/13/09 04:51 PM
actually the hip is in the corner. the backing is offset. mispoke in previous post.
Posted By: mo
Re: Overhang - 05/13/09 04:54 PM
hey mike, just noticed your post. Wow! I like that. How do the "interior" hips pass each other? that cripple looks like that was a headscratcher too. Is this built?
Posted By: Gabel
Re: Overhang - 05/13/09 05:27 PM
mo,
Use a square tailed fascia to eliminate different plumb cut heights from one side to the next. I think it looks better anyway and it looks super cool on the hip tail when it's irregular.
Posted By: bmike
Re: Overhang - 05/13/09 05:28 PM
mo -
never built, client got wet feet when we were ready to sign engineering contract.

there are 2 trusses that run parallel to each other.
the other 2 hips would be 'broken' at the truss hips.
deep housings and probably a metal strap over the top.
there would have been a curved reduction at this location to get 1 of the hips slightly smaller than the other, or a stepped housing to keep all the hips looking the same.
piece sizes are all 10x thick so we had plenty of room to get housings, etc. curved pieces were 8x thick to house into the posts and rafters.
we did quite a bit of 'freeD' modeling and engineering analysis on it. was going to be a 'hat' on a conventional stick and stone wall of a house, RF fir to control the shrinkage and curves. plenty of embedded steel (mainly due to the curves). would have built the 2 trusses on the ground, set them, and filled in the blanks.
owner bounced back and forth between us and another company. fired the original architect, came back to us later, asked for a 'simpler' solution, we did more work, then wanted the deluxe package, then flipped out and buried the project.
he wanted to be wowed and didn't want anyone to pull punches. we didn't. he flinched.
Posted By: bmike
Re: Overhang - 05/15/09 03:46 PM
p.s. Im trying to get all I can out of this software before a student license runs out. good stuff.
what software? looks like autocad... what are you driving the timber portions with - or are you using solids?
Posted By: mo
Re: Overhang - 05/26/09 01:46 AM
hey mike, timberwrestler is right. Cadwork.
to drive the timber dimensions, you just go into a 2-d plane and select beam, chose width and height (or depth) and select reference points.
here is the plan and perspective I have come up with. light roof. every X-section need not be gargantuan.


p.s. just gotta fix that rafter spacing.
thanks fellas,
Moyer