|
 Re: queen post barns
[Re: timber brained]
#28037
01/31/12 06:22 PM Re: queen post barns
[Re: timber brained]
#28037
01/31/12 06:22 PM
|
Joined: Jan 2008
Posts: 918
bmike

Member
|
|
Member
Joined: Jan 2008
Posts: 918 |
can you post up some drawings or sketches? or images?
|
|
|
|
Re: queen post barns
[Re: bmike]
#28039
02/01/12 12:42 PM
|
Joined: Mar 2002
Posts: 961
Ken Hume
Member
|
|
Member
Joined: Mar 2002
Posts: 961 |
Hi TB, You can download a trial version of EngiLab plane frame analysis from http://www.engilab.com/download.htm and this will enable you to play at inputting and visualising the effects of loads and restraints on different configurations of timber framed structures. The trial version is not time limited but instead limits the number of members that can be included in a frame. You will not be able to save your models until you contribute a little money to the struggling Greek economy. Other trial packages are available to download from the web. I am sending you (offline) results of a queenpost frame analysis using another plane frame analysis programme so that you can see typical some of the loads, load cases and restraints that need to be input to the model to help determine the various outputs for beam sizing (axial, bending, shear, deflection). You will need to have a basic understanding of structural mechanics in order to arive at a meaningful result. Regards Ken Hume
Looking back to see the way ahead !
|
|
|
|
Re: queen post barns
[Re: Ken Hume]
#28040
02/01/12 04:49 PM
|
Joined: Aug 2006
Posts: 242
timber brained
OP
Member
|
|
OP
Member
Joined: Aug 2006
Posts: 242 |
Hey Mike. I dont really have the ability to post up my pictures, I still have not figured that out yet. Here is a link to a company that builds modern barns using very traditional techniques and design. the design is just about the same. http://newenglandbarn.com/ridgefield-queenpost-barn.php Most of the these queen post barns are pretty close in a lot of characteristics, perhaps there was some kind of code or system for joiners to adhere to at this time period. I do have my own preferences though. I like to join my joists to the tie beams, not have them sleep on top. I like the look much better and dont want the extra height that sleepers add. I like to join them in a way Daiku had told me about a while ago, with 1.25" housing at half the depth of the tie beam and then screwed diagonally into the beam. I also prefer to use vertical intermediate support not horizontal struts , as I prefer to horizontal siding. Oh yeah, and this example is 38'long(14'-10-14') and mine is 36' long( 14'-8'-14') tb
|
|
|
|
Re: queen post barns
[Re: timber brained]
#28044
02/01/12 10:27 PM
|
Joined: Dec 2007
Posts: 1,882
TIMBEAL
Member
|
|
Member
Joined: Dec 2007
Posts: 1,882 |
Just as a note worth considering.... The wall girt is now joined where the tie meets and this may be a week point in the post, and causes pegging problems. Being a principle purling roof your rafter thrust is reduced so it may not be an issue. Lodging the joist on top of the ties means you figure the full size of the timber but when you cut joist pocket out then you need to figure the smaller size remaining after the joist pocket is cut, requiring a larger beam, which I thought your were trying to avoid.
The other issue I see is in relation to Ken's reply dealing with "poor design or ravages of time" thing when setting joist into pocket as described. Better than 3/4" pockets. There are other solutions which come very close to your visual requirements and deal well with the problems as I see them.
|
|
|
|
Re: queen post barns
[Re: TIMBEAL]
#28055
02/03/12 08:28 PM
|
Joined: Aug 2006
Posts: 242
timber brained
OP
Member
|
|
OP
Member
Joined: Aug 2006
Posts: 242 |
Tim. that wall girt at the same level as the tie beam, has always been a puzzle. The way I see it ,you need not to have much thrust on that post or have a very beefy post to take that connection.
In this kind of design you have sill plates and then the top plates holding the frame together with the help of braces and good sheathing, not to mention the other longitudinal joining timbers like purlin plates and tying joists.
My solution is to join that girt the same as the joist with shoulder for bearing(1.25") and diagonally screw it to the post. I really dont see any structural advantage of cutting deep mortises and pegging this "joist" at a point where you really dont want to weaken the post. I would rather do a tying joists to the tie beams.
What did you mean"Better than 3/4" pockets"?
What other solutions do you like to use?
thanks for reply. tb
|
|
|
|
Re: queen post barns
[Re: timber brained]
#28056
02/03/12 11:56 PM
|
Joined: Dec 2007
Posts: 1,882
TIMBEAL
Member
|
|
Member
Joined: Dec 2007
Posts: 1,882 |
tb, I have seen joist housed into the tie using only a 3/4" pocket, after shrinkage there is not much left for support, 1-1/4" is a better number. Basically I got tired of cutting pockets in the side of the timbers and found lodging them on top a very efficient method. With the tooling I use in my shop I find a tusk or soffit tenon to be easier than a drop in pocket and it takes no wood out of the top surface of the beam like drop ins do. The peg needs consideration, though. So mortices in the face of the tie beam, I would use 22' long joist plugged into the mortices in bents 1 and 4 they are lodged on top of bents 2 and 3., spanning from bent 1-2-3 and a shorter joist covering the third bay. Alternating long short across the frame. Also the ties in bents 1 and 4 are raised higher than the two middle bents, so the tops are flush with the joist system, this fitting your visual requirements, almost. There is always a give and take, somewhere, here you get to have to two middle tie beam uncompromised with pockets and the end bents have stronger pocket where they are carrying far less load than the mid ties.
I hear you on the tie post connection.
|
|
|
|
Re: queen post barns
[Re: TIMBEAL]
#28057
02/04/12 01:37 AM
|
Joined: Mar 2002
Posts: 1,687
Jim Rogers
Member
|
|
Member
Joined: Mar 2002
Posts: 1,687 |
I call them slide in joists as you slide them in from the outside after the frame is raised. The wall boards being nailed to them help to hold them in place and also help with the support. The amount of flooring that they hold up isn't that much. 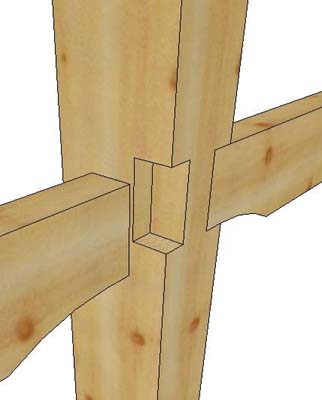
Whatever you do, have fun doing it!
|
|
|
|
|