Previous Thread
Next Thread
Print Thread
Rate Thread
Page 2 of 2 1 2
Re: English Tying Joint [Re: ] #10977 04/07/07 08:50 PM
Joined: Dec 2006
Posts: 194
E
E.H.Carpentry Offline
Member
Offline
Member
E
Joined: Dec 2006
Posts: 194
Here is a picture looking at the post from above.


Re: English Tying Joint [Re: E.H.Carpentry] #10985 04/08/07 07:14 AM
Joined: Mar 2002
Posts: 961
K
Ken Hume Offline
Member
Offline
Member
K
Joined: Mar 2002
Posts: 961
Hi EH & Derek,

Once again I have to agree with Derek.

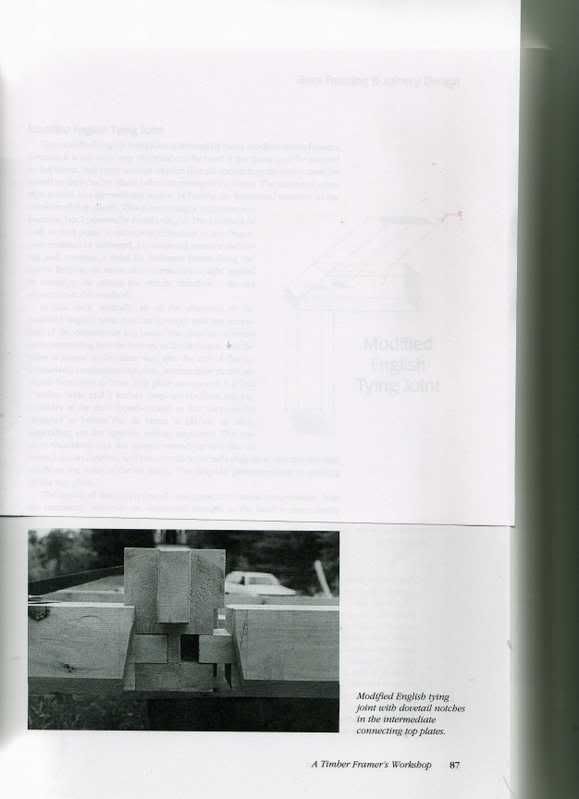
If the post in the picture is 8 inches wide then this is automatically reduced to 6 inches wide as a result of the housing or landing provided either side of the post to carry the interrupted wall plate. A small cog has been left in the centre of the post where the tenons nearly meet that appears to be about 1 inch wide and so this means that the effective length left for each of the two tenons is 2.5 inches. A peg driven through each of these tenons would need to be set on a centre line at least 1.25 inches back from the aris on the post so that would leave about 1.25 inches of relish on the end of the tenon to resist pull out when trying to resist the dovetail wedge action applied by the end of the tie beam as a result of building spread or brace action.

The performance of this joint arrangement could be greatly improved by eliminating the tenons on the interrupted wall plates and replacing these with a continuous thru free tenon or spliced joint where the pegs would now be driven through the interrupted wall plate some distance back from the joint face where an appropriate length of relish could be provided.

Personally, I would try and avoid employing such a joint configuration but it is not unknown even in very early buildings to have interrupted wall plates, though these are by no means common. The open hall arch frame at No 30, West St, Farnham, Surrrey - circa 1390 has what appears to be an interrupted wall plate set on edge.

Side Purlins might appear to provide support for continuous common rafters but in reality they sag and so rafters located towards the centre span of the purlin span tend to be unsupported by the purlin standing some distance away from same.

Personally I think that the main function of the purlin is to work in combination with wind braces to prevent racking. Few buildings have continuous common rafters pegged to the purlins and wall plates except that last pair before a hip or half hip where these "singles" rafters are pegged to purlin and plate to prevent rotation of the "singles" rafters. Obviously this set of rafters has to try and resist the racking forces developed by the hip carpentry. Driving a peg at the foot of the common rafter through the wall plate is not usually seen. Rafters should stand hard on the wall plate to ensure that they do not loose their footing and so pegged connections at purlin level can in due course result in the loss of this footing if the purlin is overly deep and cannot deform sufficiently to ensure this continued rafter footing on the wall plate.

Here endeth my Easter Sunday sermon.

Regards

Ken Hume P.Eng.
http://www.kfhume.freeserve.co.uk

Last edited by Ken Hume; 04/08/07 07:17 AM.

Looking back to see the way ahead !
Re: English Tying Joint [Re: ] #10993 04/08/07 03:32 PM
Joined: Dec 2005
Posts: 574
T
Timber Goddess Offline
Member
Offline
Member
T
Joined: Dec 2005
Posts: 574
grin grin grin

Re: English Tying Joint [Re: Timber Goddess] #10994 04/08/07 04:06 PM
Joined: Dec 2006
Posts: 194
E
E.H.Carpentry Offline
Member
Offline
Member
E
Joined: Dec 2006
Posts: 194
Hi everyone,

when I saw this photo in the particular book I thought that one must be nuts to even come up with joinery like that on paper not to mention cutting it in an actual post. No strenght to it whatsoever. I always try to keep joinery simple. Saves headaches and I do not have to worry about how to fit all the joints in a 8"x8"x8" cubicle. This would be great joinery for furniture but on a timberframe? Well, things like this happen when you are very very bored and try to come up with something that does not make a lot of sense/no sense at all. Like somebody here once wrote: If it ain't broke do not try to fix it.

Re: English Tying Joint [Re: E.H.Carpentry] #11001 04/09/07 01:02 PM
Joined: Mar 2002
Posts: 1,687
J
Jim Rogers Online Confused
Member
Online Confused
Member
J
Joined: Mar 2002
Posts: 1,687
In Steve's world there are two different timbers, that is an interrupted plate is one that is at the top of the wall, and has joints at the posts as show above.
An intermediate plate is the one I've shown from his drawing, copied from his web pages.
I didn't name them he did.
I agree to the lack of relish that Ken mentions and that this joint shown in his book is not a traditional joint and, in my opinion, puts the frame at high risk.
If it was a stand alone frame it wouldn't be long before it would be at extreme risk.
But one covered with sips or other sidings, and roofings this building with this frame design will stand. I don't know how long it will stand; but it does stand.
I've been to his school many times and I've seen him raise; these types of frames with these types of joints; by hand, with his students.

I would strongly suggest Michael have his frame design reviewed by someone who understand the load on his frame before he finishes his design process. Especially if he want to include some joints designed like this.


Whatever you do, have fun doing it!
Re: English Tying Joint [Re: Jim Rogers] #11040 04/11/07 01:35 AM
Joined: Nov 2003
Posts: 687
G
Gabel Offline
Member
Offline
Member
G
Joined: Nov 2003
Posts: 687

Continuous top plates --good. Interupted top plates with 3" tenons -- bad.


Re: English Tying Joint [Re: Gabel] #11051 04/11/07 03:47 AM
Joined: Mar 2007
Posts: 17
M
michael salbego Offline OP
Member
OP Offline
Member
M
Joined: Mar 2007
Posts: 17
Hi ya'all it's michael here, the one who started this mess. I am so glad that there are so many people out there who have responses. All the info has been great. I am new to timber framing so I still have some questions on the subject. 1. if you have a continus top plate, do you just put in a scarf joint along it as you need it to get the right length you need or what? 2. If you use a continous top plate, then you don't raise full bents right? Would you put up the post and top plates, then lay on the trusses so to speak?

Re: English Tying Joint [Re: michael salbego] #11057 04/11/07 12:29 PM
Joined: Nov 2003
Posts: 687
G
Gabel Offline
Member
Offline
Member
G
Joined: Nov 2003
Posts: 687
That's right, Michael. You have to scarf the plate sections together if the building is too long for your timber.

As for sequence, sometimes you raise walls first w/ the top plate on and sometimes you raise bents first.

If the tie sits on top of the plate, you would raise walls and set the ties/trusses on top.

If you have a dropped tie (a tie that tenons into the posts below the plate), you would raise an "H bent" -- the posts and tie beam.

And if you have 2 stories, even if you have a tie above plate, you usually raise H bents with the posts and the floor beam -- then plates then ties.

Hope this helps

Page 2 of 2 1 2

Moderated by  Jim Rogers, mdfinc, Paul Freeman 

Newest Members
Bradyhas1, cpgoody, James_Fargeaux, HFT, Wrongthinker
5137 Registered Users
Powered by UBB.threads™ PHP Forum Software 7.7.3
(Release build 20190728)
PHP: 5.4.45 Page Time: 0.035s Queries: 15 (0.009s) Memory: 3.2011 MB (Peak: 3.3980 MB) Data Comp: Off Server Time: 2024-04-24 17:34:27 UTC
Valid HTML 5 and Valid CSS