|
 set back mortises
#16022
06/25/08 11:07 PM set back mortises
#16022
06/25/08 11:07 PM
|
Joined: Nov 2006
Posts: 850
mo
 OP
OP
Member
|
|
OP
Member
Joined: Nov 2006
Posts: 850 |
Hi all, I have seen this practice in a few shops now and was wondering how many are designing and cutting like this. Basically instead of mortising from the face of the intersecting timber the mortise is then inset X from the face so that four shoulders are created. I guess shops do this reduce visible sloppy mortises but I think it only adds to the problem ("just cut the tenon back some more" or lay-out doesnt need to be perfect). The braces are cut the same way (setback mortises for lack of a better term) only adding to design time for stick drawings, layout time, cutting time, and alleviating the consequences for bad mortising and cutting. Only on pieces with out housings in mill rule. Does anyone think that this adds up to too much wasted time (a lot more tooling, I'd would say twice as much on the stick below)?  *not to scale
|
|
|
|
Re: set back mortises
[Re: mo]
#16024
06/26/08 12:23 AM
|
Joined: Nov 2006
Posts: 850
mo
OP
Member
|
|
OP
Member
Joined: Nov 2006
Posts: 850 |
No, three times as much 1. Layout a. shoulder to shoulder b. tenon lengths c. tenon placement (top and bottom) * d. lay-out "setback" 2. Cutting a. end of tenon cut (big saw) b. layout tenon (endgrain) * c. layout setback (endgrain) * d. Drop cut setback ((this would be tricky on one side, unless you want to flip the timber, Argh! not anymore than I have to),kerfing too much time)). e. Drop cut tenon cheeks * f. cut little shoulders g. cut real shoulders Basically disregarding lay-out you would have to make 8 extra saw passes (two ends). one being very trick if you do not want to kerf. One more saw depth set. This is just the quick stick (not the brace) 
|
|
|
|
Re: set back mortises
[Re: mo]
#16026
06/26/08 01:07 AM
|
Joined: Nov 2003
Posts: 1,124
Mark Davidson
Member
|
|
Member
Joined: Nov 2003
Posts: 1,124 |
I use this if the tenon/mortise are taking away too much wood, as in the rafter tenon below 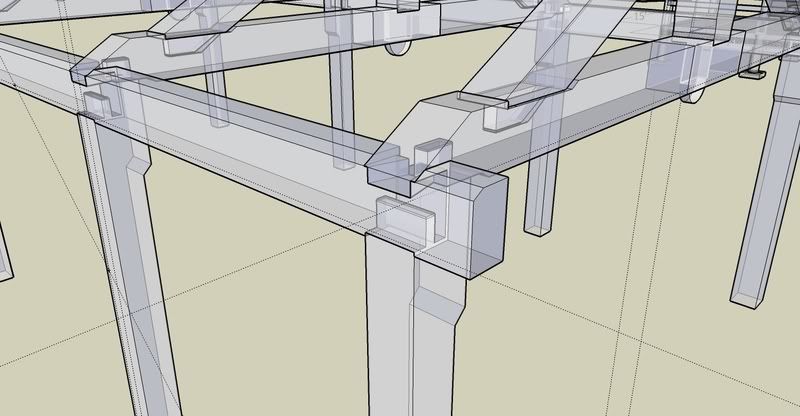
|
|
|
|
Re: set back mortises
[Re: mo]
#16027
06/26/08 01:12 AM
|
Joined: Dec 2007
Posts: 1,882
TIMBEAL
Member
|
|
Member
Joined: Dec 2007
Posts: 1,882 |
I don't see it taking three times as long, but quite surely more cutting. I am looking for short cuts, ways to lessen the time. Surely not on braces and or to hide a mortice after a few years of drying.
I do a similar cut to the tenon on a english tying post, the one going into the bottom of the tie beam. The post is flared or fan tailed and is 13"x9" at the top. The plate uses up 6" and the tie tenon is 6" leaving 1" on the shoulder as you have shown. I do this because in the past I have been left with a 11-1/4" post top and had to make adjustments I didn't like. So now I saw them a bit deeper and have plenty of wood for my tenons. Also this is the case when the post has a live edge on the inner face, plenty of wood then. Tim
|
|
|
|
Re: set back mortises
[Re: TIMBEAL]
#16028
06/26/08 01:17 AM
|
Joined: Dec 2007
Posts: 1,882
TIMBEAL
Member
|
|
Member
Joined: Dec 2007
Posts: 1,882 |
And as Mark shows also, even more so if the rafter is pushed out to the slope. If it is my choice I cut them like Marks drawings. You can see the tenon on the post I referenced. Tim
|
|
|
|
Re: set back mortises
[Re: TIMBEAL]
#16035
06/26/08 03:20 AM
|
Joined: Nov 2003
Posts: 687
Gabel
Member
|
|
Member
Joined: Nov 2003
Posts: 687 |
We do it often in high-spec jobs where shrinkage will create a peeking mortise.
|
|
|
|
Re: set back mortises
[Re: Gabel]
#16036
06/26/08 03:25 AM
|
Joined: Nov 2003
Posts: 687
Gabel
Member
|
|
Member
Joined: Nov 2003
Posts: 687 |
It is called boxing the tenon.
(I miss the edit)
|
|
|
|
Re: set back mortises
[Re: Gabel]
#16044
06/26/08 01:08 PM
|
Joined: Apr 2002
Posts: 895
daiku
Member
|
|
Member
Joined: Apr 2002
Posts: 895 |
We do this on post top tenons when square ruling. If the post is 1/4" wider than called for, we trim the tenon back 1/4" to the correct measurement. Secondarily, it hides the mortise when the post shrinks (as Gabel mentioned). We don't do it on girts, which are usually housed - we'll cut back the entire end, not just the tenon, and use a gradual reduction, not a square cut. CB.
--
Clark Bremer
Minneapolis
Proud Member of the TFG
|
|
|
|
Re: set back mortises
[Re: daiku]
#16047
06/26/08 09:24 PM
|
Joined: Mar 2002
Posts: 961
Ken Hume
Member
|
|
Member
Joined: Mar 2002
Posts: 961 |
Hi,
Another reason for cutting back on the edge of a tenon is to remove sap wood and hence to frame a joint using only heart wood.
Regards
Ken Hume
Looking back to see the way ahead !
|
|
|
|
Re: set back mortises
[Re: Ken Hume]
#16051
06/27/08 01:07 AM
|
Joined: Nov 2003
Posts: 1,124
Mark Davidson
Member
|
|
Member
Joined: Nov 2003
Posts: 1,124 |
I don't see why it takes much longer to do this. You have to cut the tenon full size, then sizing it down afterwards is pretty quick. This is a good job for the handsaw.
|
|
|
|
Re: set back mortises
[Re: Mark Davidson]
#16057
06/27/08 07:47 PM
|
Joined: Mar 2002
Posts: 1,688
Jim Rogers
Member
|
|
Member
Joined: Mar 2002
Posts: 1,688 |
When designing joinery, I usually start with establishing some "general frame rules." These are rules that most if not all of the joints of the frame will have to adhere to. Some standard general frame rules I use when designing a square rule frame are: General Frame Rules: 1.) All timbers are framed down to the next one half inch in size. 2.) Joints are laid out two inches off the layout face and two inches thick. 3.) Bents are laid out from the South, except the North most bent. 4.) Braces are framed to four inches thick. 5.) All tenons are trimmed by 1/8" in length. For quite some time I've been using the first four and just added the last one as it was assumed by me that everyone knew this, and I found that not everyone does. When we cut joints here, during workshops, we cut the reference side of the joint first to establish that it is correctly spaced off the reference side. And then we make the tenon the correct thickness taking the back off and working down towards that thickness. After that is done we have the tenon the correct offset of the reference face and also thick enough, we make it the correct width. That usually means trimming off one side to the 1/2" under rule and creating the reduction along the timber. When a tenon is joining a beam near the end of the beam there is a short section of the beam left to have enough relish on the end of the beam to make a mortise on all four sides of the tenon. But when the tenon joins a beam in the middle it usually is flush to one side, the adjacent side. If it is housed then the mortise shouldn't show much when the timber shrinks. One good drawing I saw years ago in timber framing and one that I have recreated to use to teach the correct terms is this one: 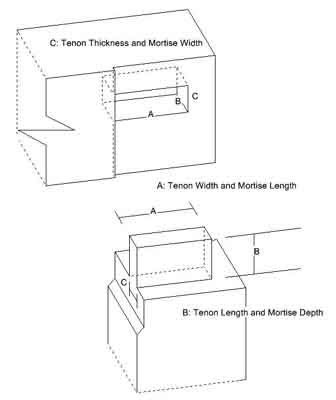 Jim Rogers
Whatever you do, have fun doing it!
|
|
|
|
Re: set back mortises
[Re: Jim Rogers]
#16058
06/27/08 08:39 PM
|
Joined: Mar 2008
Posts: 570
OurBarns1
Member
|
|
Member
Joined: Mar 2008
Posts: 570 |
I couldn't help but think multi-shouldered tenoning has been the practice of cabinet/furniture makers for centuries.
Perhaps in the early days of timber framing--which is by nature rougher than cabinetry--(I can hear the howls now!)builders were not concerned w/ hiding their mortises or concerned w/ shrinkage issues, etc. Barns were barns and joinery in homes was often covered, etc.
Now that timber framing has been "revived" joinery is celebrated instead of hidden. I guess it seems natural that some approach the craft today more like furniture making.
So Mo's original notion that full/ multi-shouldering is done today to save time (Just cut all the tenons , the mortise is hidden, etc) may in fact be just a transition from the furniture world and a step up in quality, fit and finish.
With today's standardized timbers all planed smooth, a frame really is like a big piece of furniture. Why not create the extra shoulders? And I agree w/ Mark Davidson: a handsaw is a quick way to handle things.
Don Perkins
Member, TFG
to know the trees...
|
|
|
|
Re: set back mortises
[Re: mo]
#16362
07/30/08 04:02 AM
|
Joined: Jul 2008
Posts: 20
fordh
Member
|
|
Member
Joined: Jul 2008
Posts: 20 |
The shop I work in uses mostly mill rule which we utilize this trick and have named it a "Blind Tenon". It certainly does take a bit more time; however, a hand saw and chisel skill, makes quick and easy work of it. We use it at post to plate connections. And it seems to do a fine job of hiding the mortise and tenon (if one is into that). I have never seen how the joint looks after the wood has become stable.
|
|
|
|
Re: set back mortises
[Re: fordh]
#16372
07/30/08 10:07 PM
|
Joined: Nov 2006
Posts: 850
mo
OP
Member
|
|
OP
Member
Joined: Nov 2006
Posts: 850 |
thanks for the replies everyone. good information. Can pegging placement promote directional shrinkage? If you wanted a post to girt connection and you did not want to box the tenon on all four sides but three instead could you peg towards the "unboxed" face on the tenon and have the shrinkage occur on the other side? It seems that I have heard this somewhere. Any thoughts or experience with this.
|
|
|
|
Re: set back mortises
[Re: mo]
#16396
08/01/08 03:26 AM
|
Joined: Nov 2006
Posts: 850
mo
OP
Member
|
|
OP
Member
Joined: Nov 2006
Posts: 850 |
it is easier to pull than push
|
|
|
|
Re: set back mortises
[Re: mo]
#16413
08/02/08 06:17 PM
|
Joined: Nov 2003
Posts: 1,124
Mark Davidson
Member
|
|
Member
Joined: Nov 2003
Posts: 1,124 |
Is it really easier to pull than push? I think not always. There are times I would rather use a western saw to push cut something than a japanese saw to pull cut. Pull cut chisels??
|
|
|
|
Re: set back mortises
[Re: Mark Davidson]
#17059
10/14/08 01:02 AM
|
Joined: Jun 2007
Posts: 48
bloveland
Member
|
|
Member
Joined: Jun 2007
Posts: 48 |
we do it for any post(like gabel said)is high spec. it doesnt' take as long as mo makes it seem. plus, although this is not the main reason, in out shop low man on the totem pole may get stuck with the mortiser all day, maybe all week and it puts my mind a rest knowing that he can't really screw it up unless he falls asleep on the mortiser.
|
|
|
|
|


