|
 Re: Designing With the Daisy Wheel
#23887
06/23/10 12:46 AM Re: Designing With the Daisy Wheel
#23887
06/23/10 12:46 AM
|
Joined: May 2010
Posts: 946
D L Bahler
 OP
OP
Member
|
|
OP
Member
Joined: May 2010
Posts: 946 |
That's true, you could do it that way too
However, I suspect that with such an arrangement your design should probably reflect such an offset, otherwise accuracy is going to be about impossible.
Like I said in an earlier post, I was kind of oversimplifying at the first. The only rule you can really set down is be consistent. I think that if you view the lines as lines of balance than positioning will be easy.
Also another thing, if lines mark centers how do you use a plumb bob to align timbers with marks on the ground? To me it just makes sense for that reason to have edges align.
But I should say this regarding alignment -If you find a system that works for you, by all means use it and please tell me about it too!
|
|
|
|
Re: Designing With the Daisy Wheel
#23895
06/23/10 11:22 AM
|
Joined: Dec 2007
Posts: 1,882
TIMBEAL
Member
|
|
Member
Joined: Dec 2007
Posts: 1,882 |
DL, do you receive Timber Framing, Journal of the Timber Framers Guild? In the latest issue is a wonderful article on scribing, I believe it answers your question on plumb bobs and alignment. I have only read the article once and have lent the magazine out so I can not refer back to it, exactly. Maybe someone will comment on this system.
In the line drawings you are presenting I see bent layouts, do you also show the floor on the same plan?
Tim
Last edited by TIMBEAL; 06/23/10 11:23 AM.
|
|
|
|
Re: Designing With the Daisy Wheel
[Re: TIMBEAL]
#23898
06/23/10 12:36 PM
|
Joined: Mar 2002
Posts: 961
Ken Hume
Member
|
|
Member
Joined: Mar 2002
Posts: 961 |
Hi DL & Tim, Here is how its done 1570 style. English Tying Joint Regards Ken Hume
Last edited by Ken Hume; 06/23/10 12:37 PM.
Looking back to see the way ahead !
|
|
|
|
Re: Designing With the Daisy Wheel
#23900
06/23/10 01:45 PM
|
Joined: May 2010
Posts: 946
D L Bahler
OP
Member
|
|
OP
Member
Joined: May 2010
Posts: 946 |
Alright, thanks again guys!
Tim, I use the daisy wheel to lay out the floor plan too, as well as bent spacing (or post spacing if the building does not use a bent layout) Usually my method is to draw layouts for the cross-section, floor, and roof all stacked on the same diagram (for consistency's sake) in different colors for clarification.
To clarify, I know you can align centers to floor lines, I was just stating that as an advantage of edge alignment
Tim, that website is a wonderful resource, one I use all the time. Unfortunately it is not the one I am looking for
|
|
|
|
Re: Designing With the Daisy Wheel
#23901
06/23/10 01:47 PM
|
Joined: Jan 2008
Posts: 918
bmike
Member
|
|
Member
Joined: Jan 2008
Posts: 918 |
DL - can you post up some pics of finished work? Curious how it all translates to the finished product... Would be cool to see the diagrams and then a frame or two. And if you are tech savvy - maybe a photo overlay with the geometry.
|
|
|
|
Re: Designing With the Daisy Wheel
[Re: D L Bahler]
#23902
06/23/10 02:27 PM
|
Joined: May 2010
Posts: 946
D L Bahler
OP
Member
|
|
OP
Member
Joined: May 2010
Posts: 946 |
bmike, right now I am engaged in a project using all hand hewn timbers, and the actual building of the frame will incorporate hand tools (only?) The idea is to build the thing as they would have done so in Switzerland in the late middle ages or perhaps a little afterward. SO I have several logs that I am working on, but I am working on them in the woods -and unfortunately I have a bad habit of forgetting my camera! But I have 1 or 2 pics here and there. I will try to bring my camera next time I head out to work. As a personal project and don't get to work on it as often as I'd like either.  This was an experiment, so that's why this face is narrow and has such a waney edge. It was more or less just me learning the feel of a new axe, and I didn't want to risk ruining a good face  This is an overly-large hickory log that 2 posts are being hewn out of, it was split in half and here the two halves are set up to be finished. Some very rough hewing was done prior to splitting, but a lot of tool marks still remain. This particular log has seen a lot of experimenting! 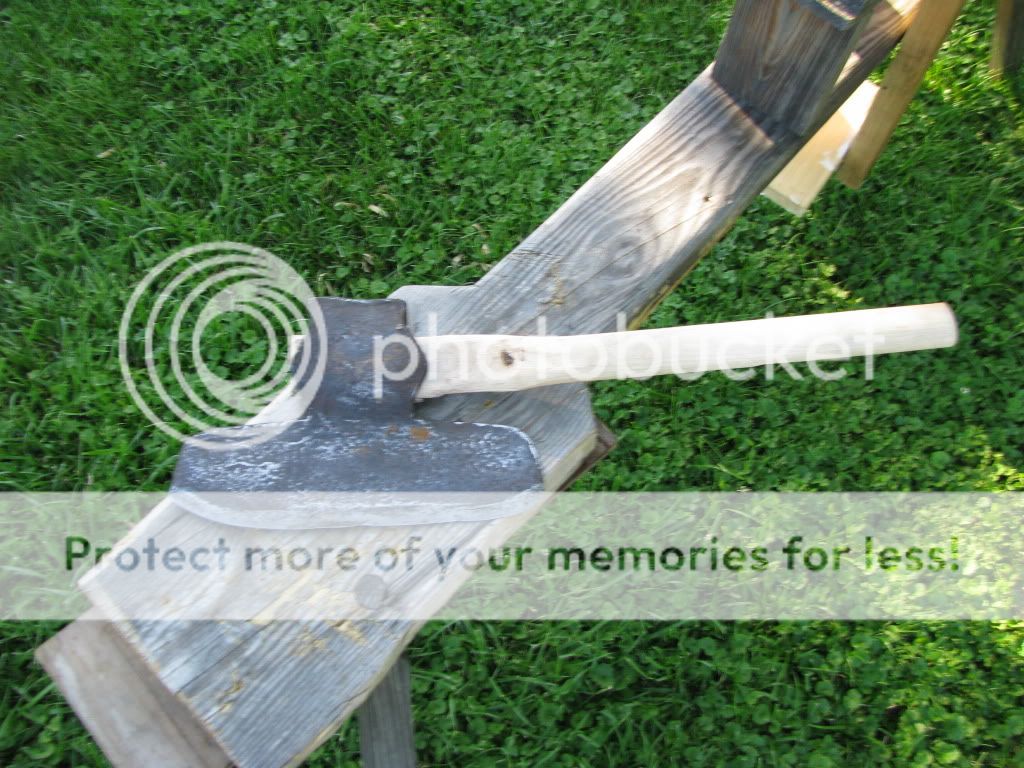 My American Broad Axe, with a 12" face. I just got doen makng that handle. I didn't feel like doing it the 'proper' way and waiting for a good hickory stave to dry out (which takes like a year) so I just made it out of a bigger handle I bought that was made for a pick axe -the eye of a pick axe is huge, so the was plenty of material to carve it out to fit the broad axe. I hen gave it the bend by clamping it down and pouring boiling water on the wood 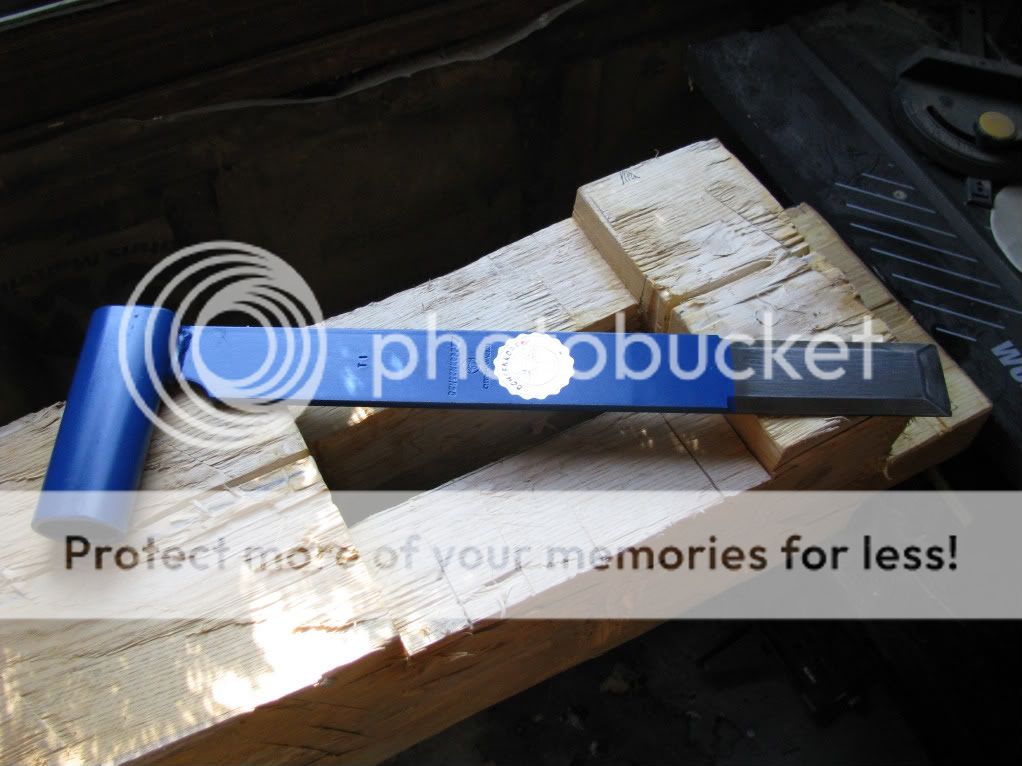 The German Stossaxt, sitting on a hewn ash timber  I like to hew the logs right where they fell, I love working out in the woods I will try to get some better pictures whenever I can
|
|
|
|
Re: Designing With the Daisy Wheel
#23904
06/23/10 02:53 PM
|
Joined: May 2010
Posts: 946
D L Bahler
OP
Member
|
|
OP
Member
Joined: May 2010
Posts: 946 |
The last post was supposed to go on the hewing thread, but the board won't let me edit it anymore for some reason. So here's the post that was supposed to be here instead. If that last one it could be removed, moderator, I would appreciate it bmike, right now I am engaged in a project using all hand hewn timbers, and the actual building of the frame will incorporate hand tools (only?) The idea is to build the thing as they would have done so in Switzerland in the late middle ages or perhaps a little afterward. I'll go ahead and post some pictures of the building as it is now -mostly half-converted logs, and post more up later. That way I can present a progression of Daisy Wheel construction from forest to frame This is an overly-large hickory log that 2 posts are being hewn out of, it was split in half and here the two halves are set up to be finished. Some very rough hewing was done prior to splitting, but a lot of tool marks still remain. This particular log has seen a lot of experimenting! I will try to get some better pictures whenever I can. I have a general layout right now, but I keep making changes to it! So that's the only reason I haven't posted it up here yet. Also I made this the other day so that I could have a good resource to study circular geometry 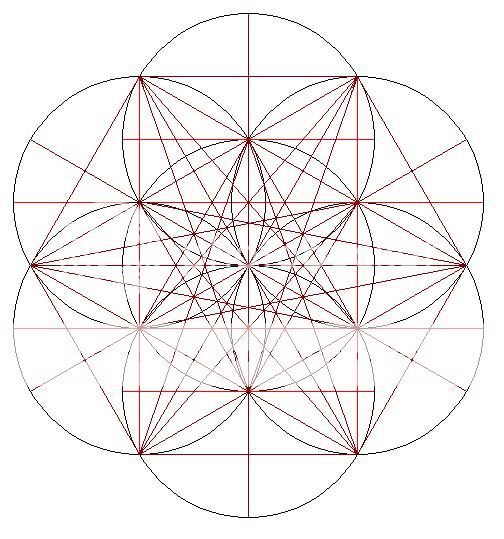
|
|
|
|
Re: Designing With the Daisy Wheel
#23905
06/23/10 03:00 PM
|
Joined: Jan 2008
Posts: 918
bmike
Member
|
|
Member
Joined: Jan 2008
Posts: 918 |
You have to be quick on the edit button! Looking forward to seeing how this translates into buildable plans...
|
|
|
|
Re: Designing With the Daisy Wheel
#23906
06/23/10 03:15 PM
|
Joined: May 2010
Posts: 946
D L Bahler
OP
Member
|
|
OP
Member
Joined: May 2010
Posts: 946 |
Yes, I have the day off so I will probably have time to get something up. Crazy rain causes all kind of problems, I bet we here have had over 6 inches in the past week!
|
|
|
|
Re: Designing With the Daisy Wheel
#23907
06/23/10 03:27 PM
|
Joined: Nov 2005
Posts: 305
timberwrestler
Member
|
|
Member
Joined: Nov 2005
Posts: 305 |
DL,
With center line layout, you would just snap the line longer than the timber, and plumb down from the ends of the timber. To follow up on my earlier question, in my mind, a king post would be centerlined.
With edge layout, an offset layout line is often snapped so that any wonkiness in the timber doesn't get in the way of alignment. Check out the current TF Magazine article that Tim mentions. I'd stick with the top and outside edge for posts, plates, tie beams, rafters, and joists. I have used the bottom of the tie on and English tying joint as the reference on a pergola, where the upper surface wasn't relevant.
|
|
|
|
|