|
 Shop Project
#25649
02/25/11 03:45 AM Shop Project
#25649
02/25/11 03:45 AM
|
Joined: May 2010
Posts: 946
D L Bahler
 OP
OP
Member
|
|
OP
Member
Joined: May 2010
Posts: 946 |
I had a topic for this project once upon a time, but it got heavily sidelined into other areas and so here is a new topic. For those of you who do not know, I am building a timber framed shop for myself. It is to be mostly a small woodworking shop, with office space as well. Right now the floor plan is 100% open, on two levels, so I can do whatever I want with the inside. This shop is being built largely as a grand experiment. I want to explore traditional tools and methods, and put into practice all I have learned about the German tradition of timber framing. The building will be a typically German style infilled timber frame. The timbers will be exposed, at least on the outside and likely on the inside as well. The infill technique used is going to be another experiment, trying out my own adaptation of a very old Swiss infill technique. See the infill topic in the enclosure forums for more details about this. I want to have some practice on both of these techniques, and on the latter especially work out any potential problems before I ever do them for someone else. The design is that of a traditional Bernese Swiss timber frame. Specifically, it would be classified as a small Stöckli. A Stöckli is one of three buildings on the traditional Bernese farm, where it was the smaller house where the grandparents would live after handing over the family farm to one of their sons (which is traditionally the youngest son, the older sons having all established their own farms or businesses with the help of the father) The other building are the great Bauernhaus, which is a massive structure that serves as the main house, the stables for the livestock at the other end, and storage for hay and equipment above. And there is the Spycher, which is a small granary and storage building. Now enough of that, back to specifics of the project... The project, as stated earlier, is also an exploration of traditional methods. To that end, everything but the rafters are going to be hand hewn. The rafters are just going to be 2x6 or 2x8, and relatively close spaced (as is part of the style) and so are not worth hand hewing. Joints are going to be hand cut using traditional German tools, like the goosewing axe, Zimmeraxt (for which I am using a Gransfors broad axe which is more or less the same in the bit) and Stichaxt. Part of my hope here is to better cultivate my skill with the axe -the Germans historically did not use saws much at all on their joints, but rather used axes. I would like to be able to do this! Now here is where I would like some contributions. I have 2 designs for the front elevation that I have come up with (the plan will be devised empirically from the front elevation) and I need to choose between them. They are basically the same, and to the casual observer they may appear identical. I won't explain the differences other than that they are designed using two different modes of Geometry. Whichever one you think looks better, let me know and if there are any specific reasons please let me know. Here they are:  This first one is designed using the geometric mode of Ad Triangulum. the geometry is based on equilateral triangles, hexagons, and hexagrams. the daisy wheel is a form of ad triangulum. http://i538.photobucket.com/albums/ff345/HiddenOrder/Riegelhaus%20Project/IMG_0033.jpg for a larger image for those of you not using firefox  The second is designed with Ad Quadratum, which is geometry derived from squares, octagons, and octagrams. http://i538.photobucket.com/albums/ff345/HiddenOrder/Riegelhaus%20Project/IMG_0035.jpgNote that for the geometries here I tried something new. I made the roof framing the primary focus of my geometry, and then derived the geometry of the walls from that. It proved to be a much easier technique than designing the geometry of the whole elevation at once. The building here is 2 stories high, but the ceilings are low at around 7 feet. This keeps the building from looking overly tall. There is a balcony running along each long wall. I have no idea what the roof pitches are, they do not come out to even numbers or anything remotely similar to an even number. I am debating what to use for building timbers. The rafters will be dimensioned pine lumber, but everything else I have to make myself. At this point, I do not know whether or not I will use native lumber or get some pine logs to use, or both. I intend to thoroughly record every step of this project for educational purposes, and for reviewing the techniques I am experimenting with. I would also like to make it open for anyone who would like to contribute in any way DLB
|
|
|
|
Re: Shop Project
#25650
02/25/11 04:18 AM
|
Joined: Jun 2009
Posts: 47
Tim Reilly
Member
|
|
Member
Joined: Jun 2009
Posts: 47 |
Wow! I really look forward to seeing your progress!
Tim
|
|
|
|
Re: Shop Project
#25652
02/25/11 04:50 AM
|
Joined: May 2010
Posts: 946
D L Bahler
OP
Member
|
|
OP
Member
Joined: May 2010
Posts: 946 |
Thanks Tim! By the way, do you have a design preference? I realize I should explain a couple of other things on the design, as it is unclear... There is a line near the top of the roof, this represents 2 things: 1. The location of a collar beam which ties the rafter pairs together, and is supported by purlins. 2: the location of the bottom of a snub hip. Also, the roof includes both the framing of the gable walls and the interior roof framing. And for comparison, here is a picture of a somewhat larger Stöckli from the Emmental. This gives you something to use to better interpret all of the lines on the two plans. 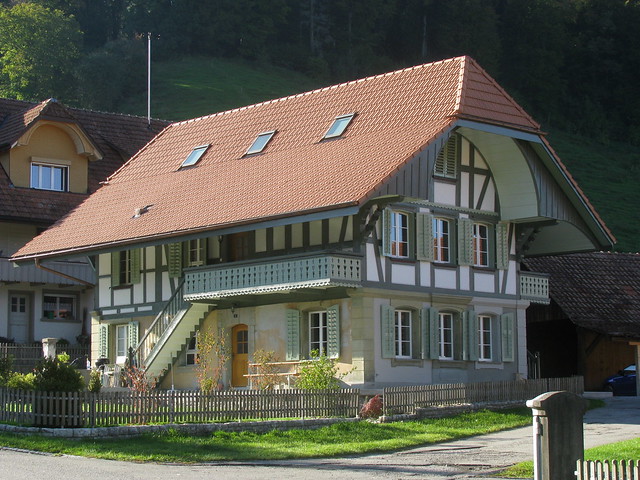 In the next week I plan on making some detailed frame drawings. I don't see how it would be possible to create accurate computer models of this building. So I am looking forward to the fun job of creating some hand drawn perspective views! The walls on this are going to be 7 inches thick, and each cavity will have a 4" deep space for insulation. There will be 3/4" of plaster and clay on the outside, supported by 3/4" (1x4) boards, and on the inside there will be a 1 1/2 inch board that sits flush with the inside face of the timbers. alternately the posts might be 6 inches deep with the inside boarded over, which would leave a 4 1/2" insulation gap. The timbers are going to be sealed off with paint and plaster on the outside, and will either be left natural or whitewashed on the inside.
Last edited by D L Bahler; 02/25/11 04:54 AM.
|
|
|
|
Re: Shop Project
#25680
02/26/11 04:56 AM
|
Joined: Jun 2009
Posts: 47
Tim Reilly
Member
|
|
Member
Joined: Jun 2009
Posts: 47 |
hmmmmmmmmmmmm.............I am going to go with the second design. After much studying of the pictures the Ad Quadratum design sits better with me. I think it has to do with the lower slope roof maybe? something about it feels more friendly.
|
|
|
|
Re: Shop Project
#25682
02/26/11 03:00 PM
|
Joined: Feb 2009
Posts: 8
dbailly
Member
|
|
Member
Joined: Feb 2009
Posts: 8 |
I agree with Tim. the Ad Quadratum is more appealing to me. I t appears to have a better symmatry, which I like better in buildings. I have German heritage, so this projects is of an interest to me. I look forword to seeing the progress.
What effects do your local building codes have on the design/construction?
Is there any examples of this style of framing in the US? I know Maryland, New Jersey, and Pennsylvania have a good stock of Germanic buildings, but I think those are more Northern German.
|
|
|
|
Re: Shop Project
#25683
02/26/11 05:30 PM
|
Joined: May 2010
Posts: 946
D L Bahler
OP
Member
|
|
OP
Member
Joined: May 2010
Posts: 946 |
I like it when you go by gut feeling here. That's what I'm looking for! I already know all the differences between the two, their advantages over each other, etc.
They are both very good choices -they are the 2 finalists from a long process of design. It is very hard to choose between 2 equally good things!
The Ad Quadratum design does have the advantage of being Ad Quadratum. Let me explain. Almost everybody today who knows about geometric design knows about the daisy wheel, and that's it. There's nothing wrong with the daisy wheel, but in reality it is only a very small part of medieval geometry. The daisy wheel is Ad Triangulum, but Ad Triangulum can be so much more than just the daisy wheel. Examine my triangulum design -you won't find the arcs of the daisy wheel, but you will see the hexagram. (I actually intentionally made my drawing without showing the circles and arcs) If youy look closer, you will see there is more to it than the daisy wheel, such as the doubled hexagram, and the system of extending lines to create new points off in space rather than only using the points available on the original diagram.
I would term my method here as extensible geometry rather than plotted geometry. Allow me to explain. Plotted geometry is where you take a figure like the daisy wheel or some circular system, and you use only those points within the plotted diagram to get your design. To 'extend' the geometry you just surround your original daisy wheel with more daisy wheel. Extensible geometry is really a much more simplified system, but perhaps more difficult to use. You have to have a pretty keen understanding of geometric relationships to make it work, and have the knowledge of how to create relationships and divide spaces if the figures you want aren't there. My form of extensible geometry is to use the core Hexagram and its divisions to design a certain aspect of the building. This should generally be the part that is the most complex and most in need of sound geometry, so it is almost always going to be the roof. So here my roof is centered on the core diagram. After I make a suitable roof, I derive the rest of my building from a combination of the roof's geometry and the points of the core diagram.
This system has the notable disadvantage of being much harder to use and requiring a lot of knowledge of geometry. It has the notable advantage, however, of being a lot more free and flexible.
----------
dbaily, I am not aware of any Swiss type buildings in the US. There are certainly buildings built in the German style, but Swiss house architecture doesn't seem to have made it here. Actually I should back up a little bit, The house architecture of Appenzell and Saint Gallen may have had a significant influence on the design of the common American house, but this is far different from the Bernese style.
Most of the Germans, and by extension their buildings, in this country are not low German. Most of the Germans who came here are from the regions now encompassed by the states of Rheinland-Pfalz, Baden-Württemburg, Bayern, (in other words South Germany) as well as Switzerland, and Austria. Take for example the Penssylvania Dutch language, once the common language of Pennsylvania and not limited to Amish and Mennonites. It is nearly identical in many ways to the current dialect spoken in the Pfalz region of Germany, but with a lot of influence in Grammar and vocab from Swiss. That's because most Germans in America are palatinate German. O hei, Ich kann au Deitsch schwetze..
The framing style exists in such places as Pennsylvania, Ohio, Indiana (In the wonderful city of Berne), Minnesota, Chicago, Cincinnati, Saint Louis, and Texas. In all of these regions, however, it was eventually overtaken by the surrounding building styles.
|
|
|
|
Re: Shop Project
[Re: D L Bahler]
#25684
02/26/11 06:39 PM
|
Joined: Apr 2009
Posts: 235
Thane O'Dell
Member
|
|
Member
Joined: Apr 2009
Posts: 235 |
Is it just me? I'm sitting here scratching my head trying to see the difference in those two sketches and for the life of me, other than some unrelated pencil lines in the background, I can't. I'm just having a hard time seeing the relationship between the concept and the pencil lines.  Also, just a note...if this is a work shop you may want to reconsider your ceiling height of only 7 ft. Light fixtures will hang down even lower. On a positive note you will likely have the most interesting shop in the neighborhood. Can't wait to see your progress as you start cutting joinery.
Life is short so put your heart into something that will last a long time.
|
|
|
|
Re: Shop Project
#25685
02/26/11 07:00 PM
|
Joined: May 2010
Posts: 946
D L Bahler
OP
Member
|
|
OP
Member
Joined: May 2010
Posts: 946 |
About the 7 foot height, here's the deal:
The final layout will be done at full scale, derived from the original drawings. What I will do is scale up the drawings.
The method I will likely use is to use my compass to make a line several times the original on the drawing, then use that line as the basis for the final dimension of the building. I can adjust the scale of enlargements to make things a little bigger or a little smaller.
The drawings were made with a general scale of 1:24, but when I enlarge the lines to make the full scale, I may use instead a factor of 26 or 27. I didn't make the ceilings higher because it made the building look odd, I instead just decided that I would scale it up a little further. This is OK, because I don't mind having a slightly larger floor plan.
About the 2 drawings, they are very similar. The best way to see the differences is perhaps to put your eyes out of focus a little bit when looking at them. They are both the same design, just with different geometries.
There is 1 problem with the AQ design, however. The braces in the gable for the wall brace against the posts. With long braces such as these that is bad. It can potentially pry the posts out of joint. I will have to account for that or alter it in the final design.
|
|
|
|
Re: Shop Project
#25688
02/27/11 01:03 AM
|
Joined: May 2010
Posts: 946
D L Bahler
OP
Member
|
|
OP
Member
Joined: May 2010
Posts: 946 |
 http://i538.photobucket.com/albums/ff345/HiddenOrder/Riegelhaus%20Project/scan0004.jpg http://i538.photobucket.com/albums/ff345/HiddenOrder/Riegelhaus%20Project/scan0004.jpgThis is a conceptual drawing I had in my notes, it's the basic design of the building but not an exact design based on either of the geometries. This in fact is the sketch I used to make my final designs, so its proportions may vary a wee little bit but it should give you a general idea of the building. Sorry not the highest quality scan in the world, but I didn't feel like waiting the amount of time it takes for my scanner to take a good image... But this should be adequate for you to better understand the lines on the elevation plans shown A few notes: Notice the windows, 1 on each level of the gable walls and 2 on the side wall shown. The side shown has a double door since it is intended to be a workshop. The other side in stead will have a single door located opposite one of the windows, with 3 windows all in a row for lots of interior light. I will have to make the windows myself I am afraid, which means they won't be energy efficient. To somewhat alleviate this problem they will likely have operable wooden shutters. There is framing around the windows, but in addition to this there will be substantial wooden trim that will largely cover up the actual structural parts to protect them from water. It is easier to replace trim than structural timbers! This drawing shows the balcony extending around the end walls, but I won't do that. Instead there will be a window box under the second story window to serve as a flower box, adding to the typically Swiss character of the buildings. (the flowers therefore have to be red)
|
|
|
|
Re: Shop Project
#25747
03/02/11 05:09 AM
|
Joined: May 2010
Posts: 946
D L Bahler
OP
Member
|
|
OP
Member
Joined: May 2010
Posts: 946 |
I've got some new help in my venture here, I will be guided and taught the techniques by a very experienced and very skilled Swiss Master Carpenter. Can't say I'm not excited about that.
This man has generously agreed to teach me as much has he is able about the traditional techniques of Swiss carpentry, in no small part because he too would love to see these techniques put into use on this continent.
|
|
|
|
Re: Shop Project
#25767
03/03/11 06:05 PM
|
Joined: Aug 2009
Posts: 306
Cecile en Don Wa
Member
|
|
Member
Joined: Aug 2009
Posts: 306 |
Hello,
Then you will certainly be needing your zunftkleidung.
Greetings,
Don Wagstaff
|
|
|
|
Re: Shop Project
#25768
03/03/11 06:39 PM
|
Joined: May 2010
Posts: 946
D L Bahler
OP
Member
|
|
OP
Member
Joined: May 2010
Posts: 946 |
Nein, sie tun nicht so in der Ländlichen Schweiz.
|
|
|
|
Re: Shop Project
[Re: D L Bahler]
#25776
03/04/11 08:40 AM
|
Joined: Aug 2009
Posts: 306
Cecile en Don Wa
Member
|
|
Member
Joined: Aug 2009
Posts: 306 |
Hello, You would be most likely to see a Swiss carpenter today wearing a baseball cap a t-shirt and some of those big ol' shorts. I have noticed that for some reason, who knows maybe with connections right back to old fashioned guild practices, that all through Western Europe every trade or even manual profession, for example farmers, seem to have their own standardized dress elements. Here in Holland the farmer - men and women - wears a light blue cover-all. And the dairy farmer has a funny green hat. Of course these days it's not strictly adhered to, but in more formal situations, these old group identifications are clear. Last week I attended a wood auction and everyone there seemed to be wearing dark green which was always the uniform of the woodsman's professions. Here's a picture of some fine young rural Swiss carpenters I plucked from the internet Greetings, Don Wagstaff
|
|
|
|
Re: Shop Project
#25777
03/04/11 12:43 PM
|
Joined: Dec 2007
Posts: 1,882
TIMBEAL
Member
|
|
Member
Joined: Dec 2007
Posts: 1,882 |
I have no problem understanding the scaling up, how the size and shape of the building is developed, and the history behind it. This leaves me with how the joinery will be executed? I don't see it being mill ruled, or square ruled but it may be possible. One of the various scribe methods, I am left to guess at. So, how will the joinery be laid out?
|
|
|
|
Re: Shop Project
#25781
03/04/11 04:16 PM
|
Joined: May 2010
Posts: 946
D L Bahler
OP
Member
|
|
OP
Member
Joined: May 2010
Posts: 946 |
The joinery is not immediately evident from the drawings, when taking joinery into account the geometric lines in the end come out only to approximates in many cases. The method will be to establish certain timbers as primary and have them fit the geometry exactly, and have other secondary timbers fit in as best as they can considering.
Being made of hewn timbers, mill rule is impossible. I will be using a scribe method.
Mill rule and square rule are both American inventions, and to this day a lot of Central European carpenters apparently don't trust a milled timber to be accurate, and as such will still scribe their joints.
Don, historically the carpenters of the remote Swiss villages would have had no association with any sort of guild. Often times there wasn't a formal carpentry trade at all. There would have been those recognized as being master carpenters, and there is much surviving work showing just how masterful they were, but they would often by occupation have been largely farmers. Such was village life in pre-industrial Switzerland. Add to this the fact that as an Anabaptist I would have been forbidden by law from being in the guilds, a practice that survived in the Canton of Bern until very recent times.
The biggest result of the lack of a guild structure among the rural carpenters is the amazing diversity of building techniques, especially true of the Canton of Bern. Building styles can totally change from one valley to the next, because the people in these valleys would have had very little and irregular contact with each other.
In Switzerland there is a very strong tradition of dress as well, but not so much as a way of identifying your trade. Rather they identify themselves with their people, with their village. There is a famous panorama in the city of Thun of that city in the 1800's, I have heard that many local Swiss can look at that picture to this day and tell you what village everyone it it is from based on the way they are dressed.
|
|
|
|
Re: Shop Project
#25785
03/04/11 09:33 PM
|
Joined: May 2010
Posts: 946
D L Bahler
OP
Member
|
|
OP
Member
Joined: May 2010
Posts: 946 |
Tim, to further clarify the issue of joinery (i didn't have time earlier to go into intimate detail)...
I have read it explained this way when referring to the structure of a timber frame: there is an ideal layout that would exist according to engineering if the various pieces were all on continuous whole linked together, but in the real world you must deal with joints and their specific characteristics as well as the nature of wood to be weaker around a joint. This causes 2 things to happen: 1 your 'ideal' frame layout is modified to fit the style of joinery you will use, and 2 the exact positioning of certain framing elements will be slightly modified to account for the inherent weaknesses in joined wood.
The lines on my drawing reflect the theoretically ideal locations of the timbers according to the system of joinery and frame layout I will be using, but certain of the timbers will not fall exactly along these lines due to such realities as timber dimensions and joint weakness.
Those timbers that are chosen as primary framing elements will be aligned directly to the lines, either with the lines marking a center of an edge. In most cases the lines will mark an edge, i.e the wall lines mark the smooth inside face of the walls and the joist lines mark the smooth upper face of the floors; this ensures that those parts of the building that most need it will have a straight even surface.
The procedure here would be to pick a reference face on the primary timbers, this face may in some cases be the nicest looking faces (where they are going to be exposed) or may be the straightest faces (where they need to make the most even possible surface), and these faces are aligned with the plan lines. The procedure for choosing which is the reference face is complicated and varies with application.
In other cases, I suspect on this building this would be in the roof support structure, the timbers will be centered on the lines rather than edge-oriented. This could be done with a reference face as before, or by using end references, aligning the ends of the timbers with the lines.
The secondary and tertiary members would use an approximate method of lineup. In the case of the long slanted wall braces the geometry is meaningless, and it is just to remind me in which cavities the braces belong. Instead the braces are aligned with the edges of the posts, as is how such braces are done. Other secondary members would be aligned a set distance off of the plan lines, likely using the reference face method.
Primary members are those members using only the plan lines to establish their locations.
Secondary members use a combination of plan lines and primary members
Tertiary members use any combination that includes secondary members.
On this plan, the primary members include: Posts, joists, ground sill, wall sill, roof sill, main roof support posts, purlins, rafters, and probably some more -the layout is set up to have as many primary members as is reasonable.
The secondary members include: wall plates, collar beams, roof struts, the braces in the gable walls, and maybe one or two others that I'm not seeing off hand here.
The only tertiary members I am aware of at this point are the braces on the side walls, which are joined to the top plates. anything that is not really a part of the frame, like door and window trim and the balconies, I am not really taking into consideration here.
This is kind of my own approach to scribe layout that I have come up with specifically for adapting this framing and joinery style to a geometric layout, I am sure that once I put it into practice I will make a few changes. As I said earlier, this project in many ways is a great experiment. We'll just have to see once...
DLB
|
|
|
|
Re: Shop Project
#25786
03/04/11 09:44 PM
|
Joined: May 2010
Posts: 946
D L Bahler
OP
Member
|
|
OP
Member
Joined: May 2010
Posts: 946 |
Tim, to further clarify the issue of joinery (i didn't have time earlier to go into intimate detail)...
I have read it explained this way when referring to the structure of a timber frame: there is an ideal layout that would exist according to engineering if the various pieces were all on continuous whole linked together, but in the real world you must deal with joints and their specific characteristics as well as the nature of wood to be weaker around a joint. This causes 2 things to happen: 1 your 'ideal' frame layout is modified to fit the style of joinery you will use, and 2 the exact positioning of certain framing elements will be slightly modified to account for the inherent weaknesses in joined wood.
The lines on my drawing reflect the theoretically ideal locations of the timbers according to the system of joinery and frame layout I will be using, but certain of the timbers will not fall exactly along these lines due to such realities as timber dimensions and joint weakness.
Those timbers that are chosen as primary framing elements will be aligned directly to the lines, either with the lines marking a center of an edge. In most cases the lines will mark an edge, i.e the wall lines mark the smooth inside face of the walls and the joist lines mark the smooth upper face of the floors; this ensures that those parts of the building that most need it will have a straight even surface.
The procedure here would be to pick a reference face on the primary timbers, this face may in some cases be the nicest looking faces (where they are going to be exposed) or may be the straightest faces (where they need to make the most even possible surface), and these faces are aligned with the plan lines. The procedure for choosing which is the reference face is complicated and varies with application.
In other cases, I suspect on this building this would be in the roof support structure, the timbers will be centered on the lines rather than edge-oriented. This could be done with a reference face as before, or by using end references, aligning the ends of the timbers with the lines.
The secondary and tertiary members would use an approximate method of lineup. In the case of the long slanted wall braces the geometry is meaningless, and it is just to remind me in which cavities the braces belong. Instead the braces are aligned with the edges of the posts, as is how such braces are done. Other secondary members would be aligned a set distance off of the plan lines, likely using the reference face method.
Primary members are those members using only the plan lines to establish their locations.
Secondary members use a combination of plan lines and primary members
Tertiary members use any combination that includes secondary members.
On this plan, the primary members include: Posts, joists, ground sill, wall sill, roof sill, main roof support posts, purlins, rafters, and probably some more -the layout is set up to have as many primary members as is reasonable.
The secondary members include: wall plates, collar beams, roof struts, the braces in the gable walls, and maybe one or two others that I'm not seeing off hand here.
The only tertiary members I am aware of at this point are the braces on the side walls, which are joined to the top plates. anything that is not really a part of the frame, like door and window trim and the balconies, I am not really taking into consideration here.
This is kind of my own approach to scribe layout that I have come up with specifically for adapting this framing and joinery style to a geometric layout, I am sure that once I put it into practice I will make a few changes. As I said earlier, this project in many ways is a great experiment. We'll just have to see once...
DLB
|
|
|
|
Re: Shop Project
#25794
03/05/11 01:39 AM
|
Joined: Mar 2002
Posts: 1,198
northern hewer
Member
|
|
Member
Joined: Mar 2002
Posts: 1,198 |
Hello everyone tonight
Hi DL
You will need a good pair of leather gloves to keep the blisters from getting to large--I know from experience that hewing the timbers even for this smallish building will try out even your master carpenter unless he is in really good shape or you do all the work, sometimes small doesn't always mean less work--smaller timbers are harder to hold and work with than larger ones.
It is going to be a tricky project to tackle first-- hewn timber and scribe rule layout is not easy at the best of times.
good luck
keep us informed
NH
|
|
|
|
Re: Shop Project
#25795
03/05/11 02:50 AM
|
Joined: Feb 2006
Posts: 718
Dave Shepard
Member
|
|
Member
Joined: Feb 2006
Posts: 718 |
I do a lot of work with small pieces, so I had to come up with a couple of work holding solutions. 11"x14" drop with clamp for hewing riven white oak brace: 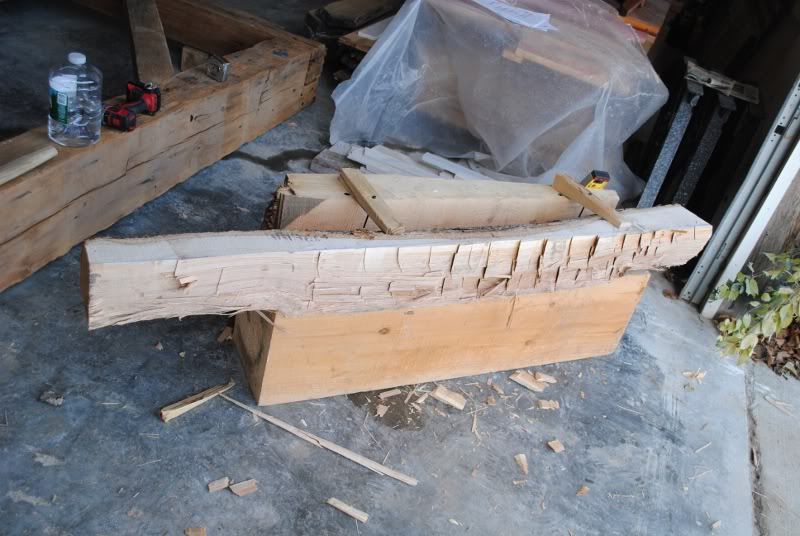 Dutch inspired trestle. I was having trouble repairing braces and studs from my Dutch barn project. Horses just walked around when I tried to chop or pare. With the trestle, there is no wiggling at all. It's six feet long, so very short pieces I clamp across just one end. 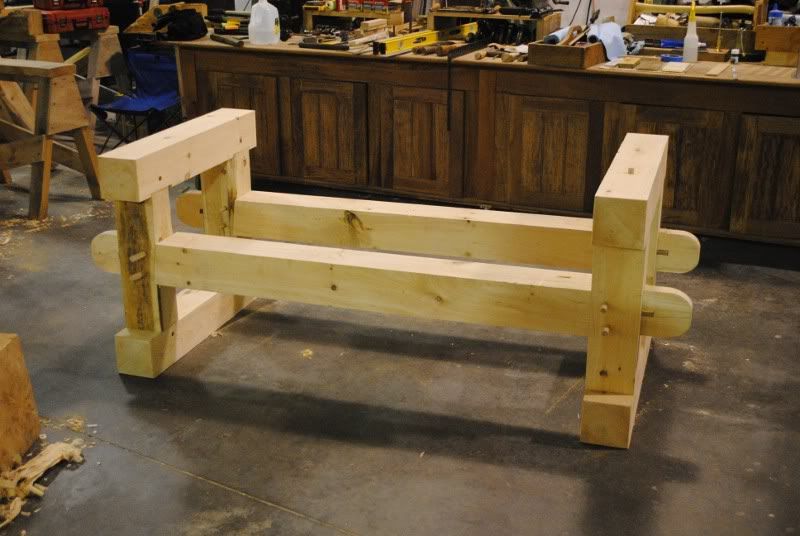
Member, Timber Framers Guild
|
|
|
|
Re: Shop Project
#25798
03/05/11 06:08 AM
|
Joined: May 2010
Posts: 946
D L Bahler
OP
Member
|
|
OP
Member
Joined: May 2010
Posts: 946 |
NH, thanks for the heads up. I know it's not going to be easy, but that's not the point is it! This isn't my first hewing experience either, so I know what's ahead of me. I am concerned though that after this winter my callouses aren't as thick and my hewing muscles are a bit out of shape. I was hewing the other day, and just got tired too fast! Guess it's time to get back in the swing of things again!
I do try to make a habit of wearing leather gloves when I hew, and usually some kind of gloves when working with most large hand tools.
I'd like to come up with a trestle sort of assembly that I can use to clamp things securely without using clamps, I've got an idea for a way to do it with friction wedges, may be I'll draw it out in the morning and see how it looks.
I've also got an idea to make a head clamp, which is just a way of securing a timber or log on one end with a massive weight, with the bulk of the piece or a sizable portion of it anyway hanging freely, allowing you to work at most of it unhindered by stands or tables. It is in a way kind of like a gigantic shaving horse head. This of course would not be a very mobile tool!
I also have a mind to go cut some poles and put up a pavilion to use as an outdoor shelter for my layout and cutting. That would further increase the traditionalism of the whole thing, and also keep valuable shop space free and clear. To keep it from becoming a mud hole, I might cover the ground (once the grass is worn off) with a good coating of ag lime.
I'm gonna go timber huntin tomorrow, maybe find some trees that would suit my needs. Though I am certainly hesitant to cut them in the spring. Likely I'll just mark them for future cutting. I've got a few down and some dead standing that should keep me busy at least till mid summer.
I'm more or less being a scavenger on this project, huntin high and low for any timber I can get my hands on!
DLB
|
|
|
|
Re: Shop Project
[Re: D L Bahler]
#25814
03/06/11 04:23 PM
|
Joined: Aug 2009
Posts: 306
Cecile en Don Wa
Member
|
|
Member
Joined: Aug 2009
Posts: 306 |
Hello,
Last summer I was 12 weeks in a row every day morning till evening hewing birch and douglas fir and pine. I must say after a time, getting out of bed became the hardest part of the day, the rest was real enjoyable even addicting work that I looked forward to doing. My hands are by no means hardened or overly calloused, probably the opposite, on the soft side yet I never felt the need to glove them. Mud won't be a problem because you'll soon have the ground covered with wood chips - in the end I was working in a wood chip trench waist high. You will be busy through more than just the summer if your on your own that is, so maybe a shelter could make sense, personally I enjoyed working out on the occasional rainy day - in which case, a big brimmed hat can be very handy.
The smaller beams I worked were 12 cm x 12 cm some with bends. Holding them with two dogs worked well enough that I never went further than that, though maybe if you went to the trouble of attaching a big rock to a chain and hanging that over the end this might work nicely, I have seen it done where a pit saw was involved.
The explanation of how work was organized is Switzerland sounds similar to what I understand it was in Holland. In fact the family we bought our house from, going back three generations at least, were carpenters as well as dairy farmers as well as the village bicycle repair shop. I use sometimes, some of the woodworking tools they left behind. Of course it's not a good idea to make a comparison but one clear difference is that in Holland this zunftkleidung truly never was adopted.
Greetings,
Don Wagstaff
Last edited by Cecile en Don Wa; 03/06/11 04:26 PM.
|
|
|
|
Re: Shop Project
#26144
04/07/11 02:09 AM
|
Joined: May 2010
Posts: 946
D L Bahler
OP
Member
|
|
OP
Member
Joined: May 2010
Posts: 946 |
I have been doing some hewing, likely this summer that will occupy most of my time and so little 'building' progress will be seen for some time. I don't have any pictures tonight, but I plan on working on it some tomorrow and so I will try and remember to bring my camera along!
The availability of standing timber has been the deciding factor in the species used for this frame, and due to the nature of some of the timbers the frame will not be exposed on the exterior but instead covered with siding, perhaps even an insulating envelope.
This project is very unique on many levels, with the building style, methods, and the method of design.
The thought has occurred to me to make this project open to the public in one way or another, whether it would be by documenting it and producing a sort of documentary/instructional from it, or to use it as a model for a series of instructional manuals and/or videos, or even to open it up as a series of workshops.
Possible topics that would be covered could include:
Hand Hewing; Axe and Hand Tool Joinery; Fachwerk and Riegelbau (German Framing techniques); Geometric design and layout; Scribing Joinery
I am just curious to see if there would be any interest in anything along these lines
If I were to organize workshops, I would need to find a more suitable location.
Please respond if any of you all would be interested in anything along these lines, so I know if I need to pursue organizing and developing.
Thanks,
DLB
|
|
|
|
Re: Shop Project
#26353
05/03/11 11:55 AM
|
Joined: May 2010
Posts: 946
D L Bahler
OP
Member
|
|
OP
Member
Joined: May 2010
Posts: 946 |
In the way of an update,
There is a chance that I will be able to build this structure out of white oak. If this is the case then the building will be built in the half-timbered style, with plastered infills. Or it will be built with exposed exterior timbers with a timber infill. In the latter case, the tradition is for the exposed framing members to be richly carved and decorated.
That is all for now, right now things are largely in the logistics stage
|
|
|
|
Re: Shop Project
#26376
05/05/11 09:00 PM
|
Joined: May 2010
Posts: 946
D L Bahler
OP
Member
|
|
OP
Member
Joined: May 2010
Posts: 946 |
I have been working out the design of the shop, and have made a few modifications. The footprint will be a little bit wider, at about 14x24 feet instead of 12x24 as earlier, and the ceilings will be a little higher as well, about 8 1/2 feet or so. I am working out the enclosure system, inspired by the traditions that the building is based on. as earlier, there are 2 candidates for enclosure. The first is the way that timbered buildings in Switzerland would have been constructed 3 or 400 years ago, exposed timbers in and out with the cavities filled in with river stone mortared with lime. The surfaces inside and out would then be given a smooth coat of lime plaster. The other technique of enclosure is to make an all wood structure. Rather than simply nail siding board onto the outside, a technique is going to be used that was used traditionally in much of Switzerland, Bavaria, and the Black Forest. This technique is to run siding boards from one post to another, and at each post have a vertical trim board attached that hides the nails for the siding, protects the frame and board ends from water, and appears to be an exposed timber itself. The biggest advantage of this is that all of your siding is under 3 feet long, making it much easier to make if you are riving it by hand. here is a diagram I drew up of the system:  http://i538.photobucket.com/albums/ff345/HiddenOrder/Riegelhaus%20Project/scan0001.jpg http://i538.photobucket.com/albums/ff345/HiddenOrder/Riegelhaus%20Project/scan0001.jpgThe trim boards stick out past the siding, and are given a decorative profile. In addition, the roof as designed was originally going to be clay tile. This idea has been abandoned and instead the roof will be oak shakes. This in combination will the enclosure methods used will serve to set the building's style back from that of the 1800's to something more along the lines of what might have been built in the 1600's or even the late middle ages. DLB
|
|
|
|
Re: Shop Project
#26432
05/17/11 02:33 AM
|
Joined: May 2010
Posts: 946
D L Bahler
OP
Member
|
|
OP
Member
Joined: May 2010
Posts: 946 |
Here are some new drawings, working out the actual timber sizes and locations. I have made a few modifications to the design.  http://i538.photobucket.com/albums/ff345/HiddenOrder/Riegelhaus%20Project/IMG_0070.jpg  I also developed a new system of geometry in the development of these drawings which is greatly simplified. More on that later... DLB
|
|
|
|
Re: Shop Project
[Re: D L Bahler]
#26617
06/11/11 04:20 AM
|
Joined: May 2010
Posts: 946
D L Bahler
OP
Member
|
|
OP
Member
Joined: May 2010
Posts: 946 |
I have made up a parts list of all of the various components needed to build this frame. I will post it here so you can get some idea of what goes into a Fachwerk style frame and so you have a scope of this project.
First, the walls. All wall timbers will be made of White Oak, because they will have exterior exposure. Also, all wall timbers will be hand hewn.
The Posts:
36 ct. 5"x5"x8' Pfost
8 ct. 5"x5"x8' Eckpfost
4 ct. 5"x5"x8' Bundständer
The Braces:
16 ct. 5"x5"x~9' Streben
72 ct.* 4"x5"x3' Riegeln
Sills
2 ct. 6"x8"x24' Grundschwelle
2 ct. 6"x8"x14' Grundschwelle
2 ct. 6"x8"x26' Saumschwelle
2 ct. 6"x8"x16' Saumschwelle
Plates
4 ct. 6"x8"x26' Rähm
4 ct. 6"x8"x16' Rähm
*This number seems big, but they are very short pieces that can easily be cut from longer stock.
The Floor beams, Deckenbalken
11 ct. 6"x6"x14' Balken
11 ct. 6"x6"x16' Balken
19 ct. 6"x6"x20' Balken
The Roof, Dachstuhl
sills:
2 ct. 6"x8"x30' Stuhlschwelle
Purlins
2 ct. 6"x8"x30' Pfette
Liegender Stuhl components
6 ct. 6"x8"x<10'* Binderstrebe/Stuhlsäule
3 ct. 6"x8"x3'* Spanriegel
6 ct. 4"x6"x3'* Jagelbüge
Rafters
42 ct. 4"x6"x15'* Sparren
42 ct. 4"x6"x6'* Aufschiebling
collar ties
21 ct. 4"x6"x3'* Kehlbalken
*exact lengths not known
all in all for the complete structure, there are 317 individual parts. keep in mind, however, that that is for the TOTAL structure, there is no additional material needed in order to enclose the structure or clad it or what have you, aside from this the only other thing needed to support any exterior cladding is rooflath. Also keep in mind, that looks like a lot of mortises and other joints to cut, but when you consider that all of the post mortises are only 1 1/2 to 2" deep it suddenly doesn't seem so bad (actually, I can't think of any single joint off hand that has any depth cut more than 2 inches, aside from the corner joints of the groundsills.
A lot of this cut list may look like gibberish to you right now, since it is in German. The reason for that is a lot of these terms don't translate well, and often times when you do translate them it is to the name of a part in American style framing that isn't quite the same, leading to confusion as to how the frame actually works and goes together. So my opinion is that it is generally best to leave the terms untranslated. Hopefully as the project progresses, the exact nature of a lot of these parts will become clearer. If you are not that patient, I suggest you go to Google.de or Google.ch and look them up!
The number of parts is inflated by the amount of short pieces there are in this frame, which for the purposes of hewing will be cut from much longer stock in most cases. At the same time though, a lot of the longer pieces (joists excepted) will be made of 2 or more shorter pieces, to make manual rtansport a possible task, and to allow me to get higher yields out of every individual tree. (If I am splitting out larger trunks, I can make more efficient use by splitting out shorter sections and splicing them together later) The long purlins, however, will probably be made of individual lengths of good strong white ash.
The walls will be made entirely of white oak, however a significant amount of the roof is going to be made out of mixed hardwoods including ash, hickory, and cherry. A lot of the interior structure, like interior walls, will be made these as well.
That's all for now. I have been cutting down the trees, measuring, and figuring, and now it's just about time to start cutting out timbers! Needless to say, I am more than a little bit excited that I am finally getting to the point of doing some real work!
More updates to come, hopefully soon.
Also, I have eliminated the balconies from the design. The biggest reason is that I could not get them to come out right in relation to the roof and still look good while being functional. With this in mind, I have altered the building to have a little more of a late medieval style, including a double-sloped roof (Aufschiebling).
DLB
Last edited by D L Bahler; 06/11/11 04:28 AM.
|
|
|
|
Re: Shop Project
#26618
06/11/11 06:09 AM
|
Joined: Nov 2006
Posts: 850
mo
Member
|
|
Member
Joined: Nov 2006
Posts: 850 |
DL, we have plenty of shop space and tools.
|
|
|
|
Re: Shop Project
#26624
06/11/11 03:19 PM
|
Joined: May 2010
Posts: 946
D L Bahler
OP
Member
|
|
OP
Member
Joined: May 2010
Posts: 946 |
Mo, I'm not sure I quite understand what you're sayin here?
DLB
|
|
|
|
Re: Shop Project
#26626
06/12/11 01:26 PM
|
Joined: Nov 2006
Posts: 850
mo
Member
|
|
Member
Joined: Nov 2006
Posts: 850 |
Hey DL, It appears I posted on the wrong thread. I was trying for the other one you had awhile back about a workshop. Did you ever get any feedback? Don't want to hijack this one, let me know through a pm.
Cheers.
|
|
|
|
Re: Shop Project
#26627
06/12/11 04:44 PM
|
Joined: May 2010
Posts: 946
D L Bahler
OP
Member
|
|
OP
Member
Joined: May 2010
Posts: 946 |
|
|
|
|
|