|
 Scarf joints for beginners. Design and placement
#28599
04/27/12 07:34 PM Scarf joints for beginners. Design and placement
#28599
04/27/12 07:34 PM
|
Joined: Jun 2010
Posts: 49
danfink
 OP
OP
Member
|
OP

Member
Joined: Jun 2010
Posts: 49 |
Hello all,
I'm building a porch onto a small structure that I've built, and will be timber framing a simple bent to support the rafters and roof. The plate will be two 8x8s, scarfed together. I haven't ever cut a scarf joint before, let alone designed the placement of one, and am looking for some advice.
It seems there are many variations on the scarf joint, and I know the Guild has been testing (busting) them at their conferences. Whats a version that works well and is simple enough for a scarf-first-timer to cut? Pictures? Pages in a book? Detailed description?
Also, I understand that scarfs are best located above braces? Is this correct? If so, how/where specifically? I will have 3' braces at each post. Where does the brace joinery fall in conjunction with the scarf?
Thanks so much, and you all rock!
Dan
|
|
|
 Re: Scarf joints for beginners. Design and placement
[Re: danfink]
#28605
04/28/12 03:26 PM Re: Scarf joints for beginners. Design and placement
[Re: danfink]
#28605
04/28/12 03:26 PM
|
Joined: Mar 2002
Posts: 1,687
Jim Rogers

Member
|

Member
Joined: Mar 2002
Posts: 1,687 |
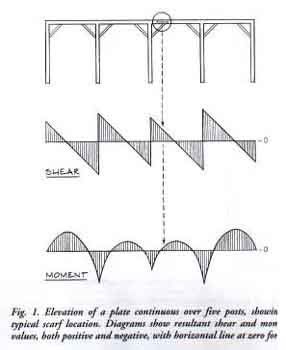
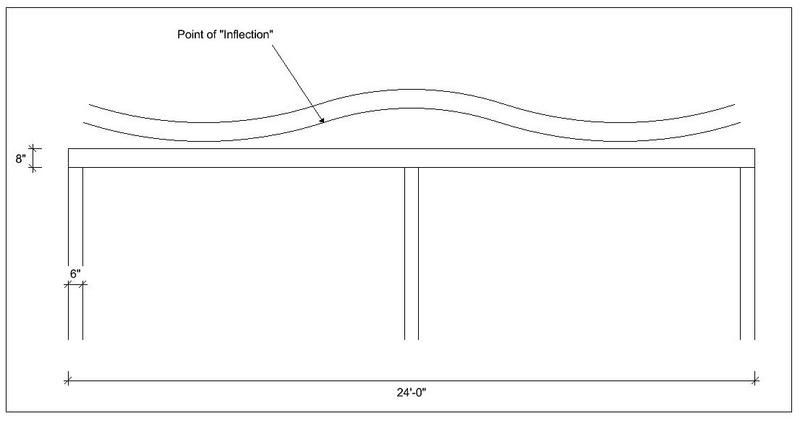
There are some standard rules for scarf locations and sizes. One that is important, at least to me, is the amount each timber overlaps the other timber it is joining. I used to use 3 times the depth of the timber. But a while ago, I asked Jack Sobon what he uses for a standard. And he said he uses 4 times the depth. So if your timbers are 12" deep then you need a four foot scarf. The next standard rule is the location of the scarf. This picture below is a graph of the stresses on a plate when supported by several posts. To read this graph you look at the line labeled "Shear". Here you will see that the shear is highest right over a post. This is the reason you don't want to have your scarf over a post. This is where the highest shear point is and you have cut your nice 12" deep beam in half. Next look at the line labeled "moment" this is where the most load will be pressing down on the plate. It is in the middle between the supports. You don't want your scarf here as you have cut your nice 12" deep beam in half again. You want to make your scarf someplace where there is a balance between these to force/stress points.  The reason for setting the scarf joint just off the post is that is will receive less stress there. Look at this drawing:  Between the posts the unsupported timber will sag or deflect. Over the center post the timber will crown. This causes this "exaggerated" wave shape effect in the timber. At the point where the sag or deflection changes to a crown is called the point of "inflection". This point is where the timber is neither sagging nor crowning. It has the least amount of both forces. This, I am told, is where the joint should be made. If I understand all this correctly. I hope this helps to explain why joints shouldn't be made over posts or directly between the posts. Jim Rogers
Whatever you do, have fun doing it!
|
|
|
 Re: Scarf joints for beginners. Design and placement
[Re: danfink]
#28606
04/28/12 03:51 PM Re: Scarf joints for beginners. Design and placement
[Re: danfink]
#28606
04/28/12 03:51 PM
|
Joined: Mar 2002
Posts: 1,687
Jim Rogers

Member
|

Member
Joined: Mar 2002
Posts: 1,687 |
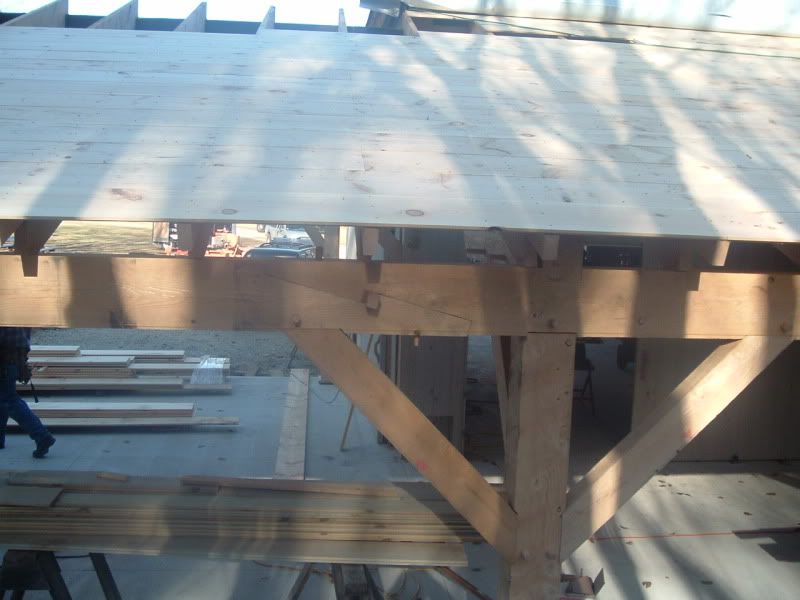
Whats a version that works well and is simple enough for a scarf-first-timer to cut? Pictures? I have cut both the bladed scarf joint and the stop splayed tabled scarf with under squinted butts and wedges. But it depends on whether or not your two timbers you are joining will be in tension or not. Some scarfs are not the best for tension timbers, because the stress is put into the pegs or fasteners holding the two pieces together. Your scarf will depend on where they are in your frame and whether or not your timbers are in tension. Your question says that these are plates, these usually aren't in tension like a tie beam is, so you maybe able to use a fairly simply scarf joint. There is a free download from the guild, the Historic joinery series has one chapter on scarfs. Chapter 6. You should download that and read it. And to answer your question about the brace joint coming in to the scarf joint location, your brace should support the scarf joint location.  Normally I like to have the lower side of the scarf being supported by the brace. If you want you can call me and we can talk about your scarf joints and locations. Jim Rogers
Whatever you do, have fun doing it!
|
|
|
 Re: Scarf joints for beginners. Design and placement
[Re: Jim Rogers]
#28610
04/28/12 06:12 PM Re: Scarf joints for beginners. Design and placement
[Re: Jim Rogers]
#28610
04/28/12 06:12 PM
|
Joined: Feb 2012
Posts: 273
D Wagstaff

Member
|

Member
Joined: Feb 2012
Posts: 273 |
Hello,
One possible way to approach this first time attempt at making a scarf joint is to, without doubt get some of the basic technical things straight in your mind like the configuration within the overall construction element like Jim has so well laid out here, But it might be a mistake to choose for an over-simplified version because one of more complexity seems intimidating. It is to me quite often surprising just how stiff and solid adjoining two lengths in-line can be with a little extra effort. The confidence of successfully jointing like this can eliminate reticence to using such joints in the future. I just mean when you see how effective a joint which is stub-tenoned, cogged with an inclined lapped table and wedged can be maybe that will encourage further pursuit in place of the discouragement of a simple inclined, maybe shouldered effort that wobbles around there until you hammer a few spikes through it.
I will add though, and Jim is definitely more read and experienced than me on the matter, but I would have made the joint he has pictured differently with the supporting length of the scarf- that is the underneath table - next to the post where it would be supporting the top half of the scarf out from there. Conceptually then the post is the supporting reference rather than the brace which is then largely irrelevant in relation to the scarf.
The method I would be thinking of in terms of laying out the joint is based on a center line and using the dimensions of my square as references.
Greetings,
Don Wagstaff
|
|
|
 Re: Scarf joints for beginners. Design and placement
[Re: D Wagstaff]
#28611
04/28/12 09:36 PM Re: Scarf joints for beginners. Design and placement
[Re: D Wagstaff]
#28611
04/28/12 09:36 PM
|
Joined: Mar 2002
Posts: 1,687
Jim Rogers

Member
|

Member
Joined: Mar 2002
Posts: 1,687 |
We had to do the scarf that way because this back wall assembly was 56'long.
We had several scarfs in it and due to the end we had to raise first we wanted the plate timbers to lower down onto the previously raised timber.
Jim Rogers
Whatever you do, have fun doing it!
|
|
|
 Re: Scarf joints for beginners. Design and placement
[Re: Jim Rogers]
#28632
05/02/12 12:49 AM Re: Scarf joints for beginners. Design and placement
[Re: Jim Rogers]
#28632
05/02/12 12:49 AM
|
Joined: Jun 2010
Posts: 49
danfink
 OP
OP
Member
|
OP

Member
Joined: Jun 2010
Posts: 49 |
Thanks Jim and Don for the responses.
I am going to read the link you sent me of Jack's writings, and will post once I've designed my joint.
Thanks!
Dan
|
|
|
 Re: Scarf joints for beginners. Design and placement
[Re: danfink]
#28636
05/02/12 10:11 AM Re: Scarf joints for beginners. Design and placement
[Re: danfink]
#28636
05/02/12 10:11 AM
|
Joined: Dec 2007
Posts: 1,882
TIMBEAL

Member
|

Member
Joined: Dec 2007
Posts: 1,882 |
In a perfect world we would have long timber and no need of scarf joints. I have never had to use a scarf in a tension situation. I also have never built any large bridges. Sills and top plates are where I find them used. I try to keep things simple and I don't hold back with a scarf, I keep it as simple as required, I won't put extra work into something that does not need it. My favorite scarf is the halved and bridled. If I need some extra grunt I may put a table in it and some extra pegs, even some iron.
Also in this imperfect world scarfs do not always fall in the positions Jim described. It would not be the end of the world if it fell on a post. I would not favor it out in the middle of the bay, though. I like Jim's example, it shows things do not always fall as neat as we wish.
An obvious item to be pointed out, cut the scarfs in the butts, the wood is usually clearer, knot free-ish, and square edged, as opposed to the tops which usually are bark plenty and knotty. Cut the scarf first, assemble it and bore any peg holes dead last, after all fitting is completed. Then assemble it fully and pull all layout including the docked ends as one long stick.
|
|
|
 Re: Scarf joints for beginners. Design and placement
[Re: TIMBEAL]
#29905
12/10/12 08:37 PM Re: Scarf joints for beginners. Design and placement
[Re: TIMBEAL]
#29905
12/10/12 08:37 PM
|
Joined: Jun 2010
Posts: 49
danfink
 OP
OP
Member
|
OP

Member
Joined: Jun 2010
Posts: 49 |
Hey all! Thanks to all who responded to this post! Very Helpful! I'm still not sure which scarf joint I'll use, but I like the one Jim used in the picture he posted, and I like the halved and bridled one that TIMBEAL spoke of. So, while I still figure out the specifics of the joinery, I have a question regarding its placement. I understand the forces involved and the need to place the joint in the location of least-stress. I do have this luxury, but now need to know the SPECIFICS. I've attached a little sketch to help with clarity: [img:center] http://www.flickr.com/photos/danielcha/8261368201/in/photostream/lightbox/[/img] It seems if the joint is further to the right, there will be more meat where the brace enters the lower timber, but then is the scarf joint itself still located in its ideal location? Or do I move the joint more to the left. That means less meat where the brace enters the lower timber, but does that better position the scarf joint? All of this is generally speaking, of coarse. That is, generally speaking about these SPECIFICS! Also, I hope to stick two braces in that center post at the same location. Do I need to do anything different here in terms of joinery? Thanks so much! Dan F.
|
|
|
 Re: Scarf joints for beginners. Design and placement
[Re: danfink]
#29906
12/10/12 08:51 PM Re: Scarf joints for beginners. Design and placement
[Re: danfink]
#29906
12/10/12 08:51 PM
|
Joined: Jun 2010
Posts: 49
danfink
 OP
OP
Member
|
OP

Member
Joined: Jun 2010
Posts: 49 |
I guess one option would be to center the scarf joint over the brace? That would probably look similar to my drawing. I'm just not sure 1)Where exactly the point of inflection is, and 2)The balance between best locating the scarf with also positioning it appropriately for the brace.
|
|
|
 Re: Scarf joints for beginners. Design and placement
[Re: danfink]
#29910
12/11/12 12:06 PM Re: Scarf joints for beginners. Design and placement
[Re: danfink]
#29910
12/11/12 12:06 PM
|
Joined: Dec 2007
Posts: 1,882
TIMBEAL

Member
|

Member
Joined: Dec 2007
Posts: 1,882 |
As for where the two braces come together on the post.... It looks like you are using 8x8 material. Are you housing the braces and how much? If each brace is housed 1" and your tenons are exactly 3 inches long, forget 4" long, the but ends of the braces will come in contact and hold the shoulders from the post housings. So adjust accordingly. I favor using 9x stock when housing a full inch so this is not an issue. Not a problem at all, if you plan for the details.
Good luck with the scarf location. It is right there within a few inches.
|
|
|
|
|