|
 How to cut a post in place.
#6488
11/15/06 05:03 PM How to cut a post in place.
#6488
11/15/06 05:03 PM
|
Joined: Mar 2002
Posts: 1,687
Jim Rogers
 OP
OP
Member
|
|
OP
Member
Joined: Mar 2002
Posts: 1,687 |
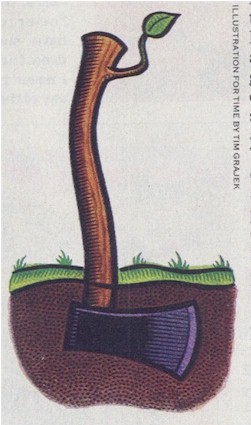
How to Cut a Post in Place by Jim Rogers 11/10/06 When restoring a structure that has some rotten post bottoms it is sometimes necessary to cut off the rotten end and replace it with a new post bottom, to support the structure at the sill. First you have to temporarily support the structure so this work can be done. You should relieve all weight off the post and it has to be securely supported. Next, you’ll need to identify which face of the post is the layout face and which will be the adjacent face. In the drawing below the reference face is labeled with a triangle that has been colored in solid black. 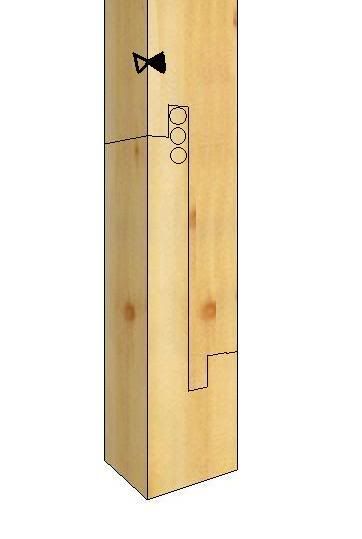 This triangle points to one edge of the timber which is the reference edge. The adjacent face is also labeled with a triangle pointing to the reference edge and this triangle is not colored in. It is known as the open triangle. All measurement will be drawn from the reference edge. In this example the post is not square. It is a 6"x 7" post, as shown below: 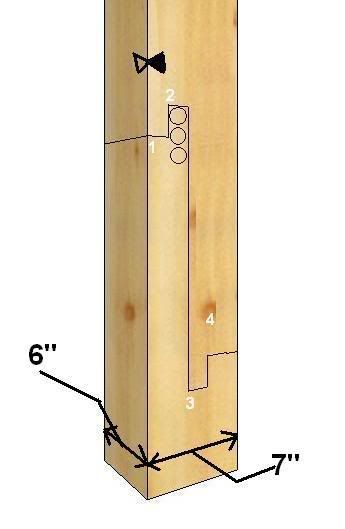 The scarf joint being used in this example is known as a bladed scarf joint. To lay it out on your post you’ll need to divide the post into four equal sections, if possible. Each section will either have one part of the blade or its mating mortise. With this post we chose to use a section dimension of one and one half inches. And the extra inch was left on the face opposite the adjacent face. This made the framing square the tool for layout, as the tongue of the framing square is one and one half inches wide. These four sections are labeled one through four in the above drawing. In laying out a bladed scarf joint there are two short tenons that are called the short overlap, and then there is the long overlap. In this example we used eighteen inches as the distance of the long overlap. One “rule of thumb” is that the long overlap should be three or four times the thickness of the piece. Six inches times three equals eighteen inches. The short overlap in this example was three inches but the standard is usually two inches. The layout if this scarf has to be located above where the rot is and needs to be cut into “good” wood. And it is usually preferred that the side of the post toward the inside of the building have the long overlap to preserve the most original fabric on the visible side. The entire layout should be drawn on both the reference face and the face opposite the reference face, with lines connecting the cuts drawn on the adjacent face and the face opposite the adjacent face. Each of these cut lines should be scribed with a knife to score the fibers of the timber. After scribing the lines, two or three holes should be laid out and bored into the upper portion of the long overlap mortise, from the two opposing sides. As shown in the drawing above. When the holes have been bored through so that they intersect in the middle of the post then you can begin cutting away the waste wood to create this joint. The first cut to make is the end cut as shown in the drawing below in red: 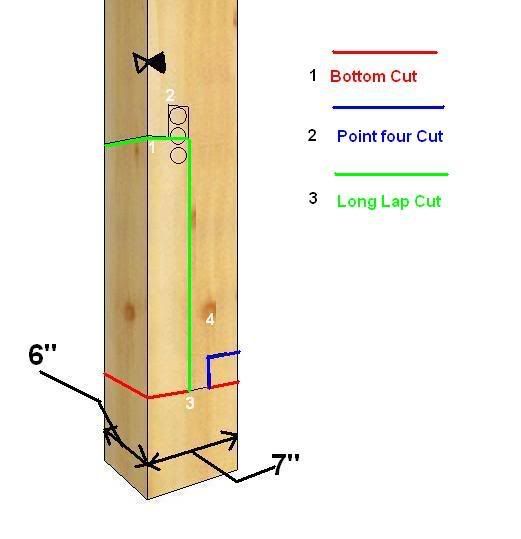 This will create the end of section number three. The second cut can be made to create section number four, sizing the short overlap to the desired dimension, in this case one and one half inches. Shown above as the blue line. The next cut to make is the green cut line, which is the long lap cut, creating end number one. After this cut is made, the section number two can be chiseled out. During this chiseling the section number one is sized to the desired dimension, again in this case one and one half inches. When done the post should look like this:  Here are some examples of this joint and its matting repair piece in place: 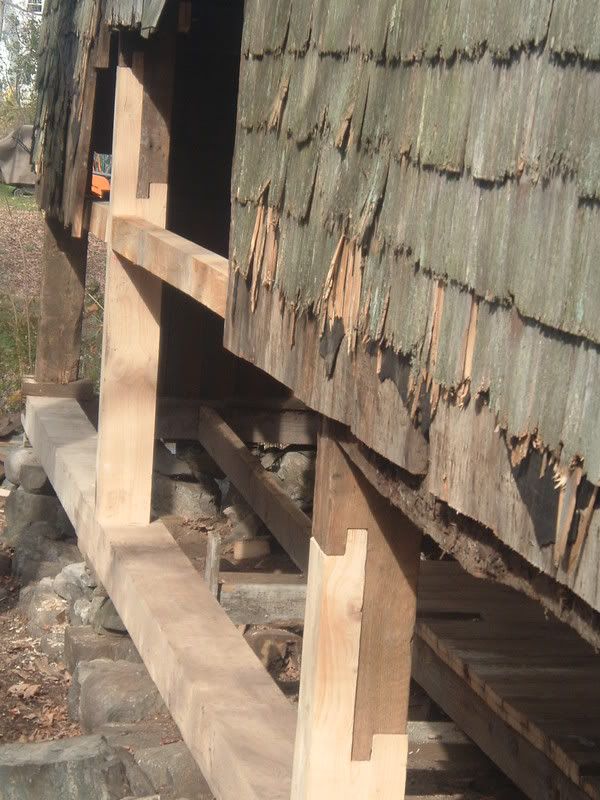 And: 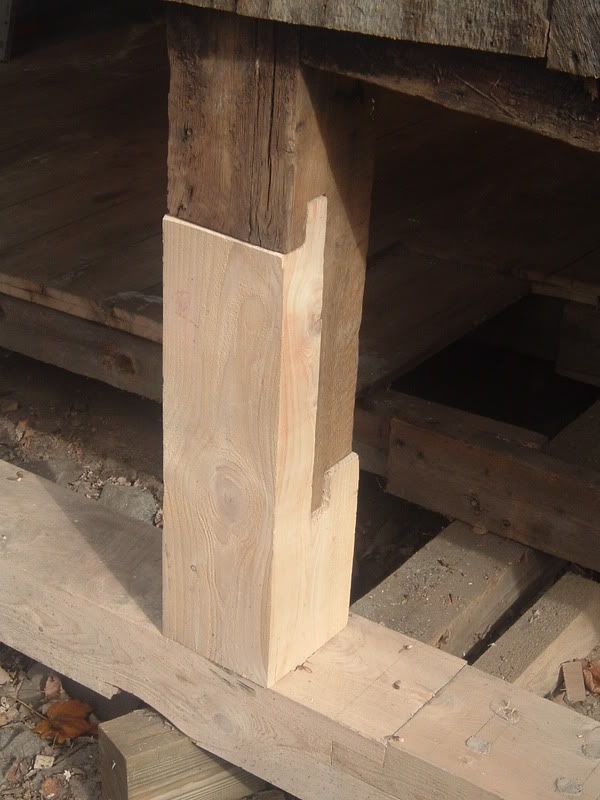 Also: 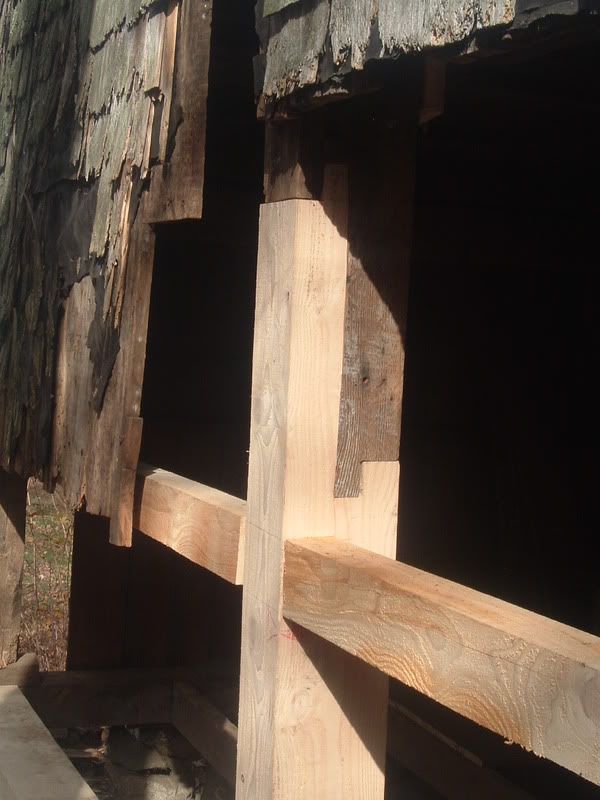 In order to make this joint work correctly and support the load of the building you have to fit the original post to the repair piece so that all four points/section touch at the same time. These four points of connect are shown here:  When we first cut the repair piece, we cut near the scribed line, but not on the scribed line, so that the piece is just a little too big. This is called “leaving the line.” Then as we fit these two pieces together we slowly trim each of these pieces to the line and continuously test fit them together until they mate. In this example these are the vertical cut lines. Then once it fits together with the vertical cut lines trimmed; we then go to the trimming of the horizontal cut lines that make the four points of contact. To fit the repair piece to the original post, and make all four points of contact connect or touch you have to trim the longest point back until the second longest one touches also. By the longest point, I don’t mean point number three, I mean the first point that touches when the repair piece and the post are assembled. Once you have trimmed either of the pieces so that the first and second longest points touch, you then trim both of them until the third longest point touches. After you have trimmed the two longest points so that now three points are in contact, you trim all these three points until the fourth point is in contact. This trimming may only involve trimming off a saw cut, or half a saw cut. You may have to assemble and disassemble this repair piece to the post several times to get it to fit. I hope this has helped you to understand how to cut and repair a post in place. Questions and comments are welcome. Jim Rogers
Whatever you do, have fun doing it!
|
|
|
|
Re: How to cut a post in place.
#6489
11/16/06 12:43 AM
|
Joined: Jul 2006
Posts: 26
Mad Professor
Member
|
|
Member
Joined: Jul 2006
Posts: 26 |
Hi Jim,
Nice work and great posting. One question, do you ever secure the joint with a peg?
|
|
|
|
Re: How to cut a post in place.
#6490
11/16/06 05:45 AM
|
Joined: May 1999
Posts: 40
Scott McClure
Member
|
|
Member
Joined: May 1999
Posts: 40 |
Nice post Jim.
A router template can speed things up & insure repeatable accuracy if you have very many of these to do.
|
|
|
|
Re: How to cut a post in place.
#6491
11/16/06 02:35 PM
|
Joined: Mar 2002
Posts: 1,687
Jim Rogers
OP
Member
|
|
OP
Member
Joined: Mar 2002
Posts: 1,687 |
Yes these vertical scarfs are pegged. The timber framer doing this job, hadn't made enough pegs yet. We were taught to do at least four in the middle long lap area. Spaced 2" off each outside edge and slightly angled towards each other. As shown in the drawing below: 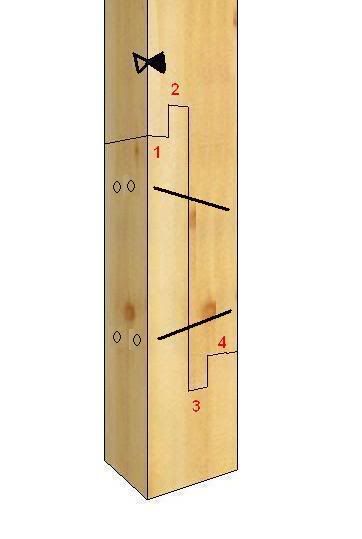 The angle doesn't need to be more than 5 degrees. And this timber framer did make a template for laying out these scarfs. Jim Rogers
Whatever you do, have fun doing it!
|
|
|
|
Re: How to cut a post in place.
#6492
11/16/06 06:10 PM
|
Joined: Dec 2005
Posts: 574
Timber Goddess
Member
|
|
Member
Joined: Dec 2005
Posts: 574 |
Jim -
Thanks for the post (no pun intended! Well, maybe...)
I'm wondering what was used to secure the weight of the post before cutting; I picture a couple of 4x4's or 6x6's on either side, but does this give you room to do the joinery, especialy the drilling?
*K
|
|
|
|
Re: How to cut a post in place.
#6493
11/16/06 11:34 PM
|
Joined: Mar 2002
Posts: 1,687
Jim Rogers
OP
Member
|
|
OP
Member
Joined: Mar 2002
Posts: 1,687 |
*K:
Each post had a girt connecting it to the center post, and this girt was also holding up the second floor and or floor joists.
To support the rotten ended post the timber framer put in a good ground block and then a piece of new 6x7 post with a hydraulic jack on top of it. Jacked up the girt to hold up the building, including the second floor, and then put in another supporting post, as a safety just in case the hydraulic jack failed. The post was held in place by some truck straps going from gable end post to rotten post on both sides.
This made the rotten post very stable so that he could drill the hole(s),make the cuts and chop out the section with his chisel, without the post waving all around.
The shorter of the two posts still had a nailer with sheathing hooked to it so that one wasn't as wavy while it was hanging in mid air. But it was still held in place with truck straps going in the gable to gable direction.
Jim Rogers
Whatever you do, have fun doing it!
|
|
|
|
Re: How to cut a post in place.
#6494
11/17/06 12:00 AM
|
Joined: Dec 2005
Posts: 574
Timber Goddess
Member
|
|
Member
Joined: Dec 2005
Posts: 574 |
Sounds good and stable!
Thanks, Jim.
*K
|
|
|
|
Re: How to cut a post in place.
#6495
11/17/06 01:02 AM
|
Joined: Apr 2002
Posts: 895
daiku
Member
|
|
Member
Joined: Apr 2002
Posts: 895 |
Nice Post, Jim.
Nice Pun, Goddess.
--
Clark Bremer
Minneapolis
Proud Member of the TFG
|
|
|
|
Re: How to cut a post in place.
#6496
11/17/06 10:32 PM
|
Joined: Feb 1999
Posts: 116
Rudy R Christian
Moderator
|
|
Moderator
Joined: Feb 1999
Posts: 116 |
Good stuff Jim,
My only suggestion would be to consider the use of screw jacks (also known as barn jacks) in place of hydraulic. It's much easier to gauge how much force you're applying to the frame (more weight means harder to turn jack screw) and they're not going to come back down until you're ready. I also like to use cribbing stacks instead of posts when its practical since they don't kick out.
Cleary a matter of personal choice on my part. Trust me it comes from learning the "hard" way.
Keep the good info coming!
Rudy
|
|
|
|
Re: How to cut a post in place.
#6497
02/05/07 12:41 AM
|
Joined: Jan 2007
Posts: 71
Timbo
Member
|
|
Member
Joined: Jan 2007
Posts: 71 |
I've done a few of these and a hydralic jack worked fine with some buildings. Usually with a solid post back-up (while working on it), size depending on the barn in question. Some jobs you gotta have cribbing for the added stability. Screws jacks are supposed to be great for lower buildings raised by hydralics. I use hydralics almost exclusivly , but I would warn rookies about letting them down ( and going up) they can be deadly.
Great joinery! My clients usually don't aprieciate that level of joinery (the're cheap) so we usually use a 2' lap w/ 3 bolts w/ washers.
Timothy W Longmore
|
|
|
|
Re: How to cut a post in place.
#6498
02/05/07 04:35 PM
|
Joined: Aug 2005
Posts: 4
Scotty
Member
|
|
Member
Joined: Aug 2005
Posts: 4 |
Jim: I posted in the Barns and Trad section regarding this topic, sort of. I have a barn that has some rot to the bottoms of the post and they are too short. I had theorized that I could scarph in additional length to all six posts in the 18x28' barn. Consensus has been that having all posts extended would be too unstable although one respondent thought it would be a "a fun project" but not one they would undertake.
The posts are currently 14 feet with a second floor hung at half way. I want to use this as a wood working shop and thus would like the first floor to be somewhat higher. A pony wall of sorts is the leading solution but I would like your opinion of extending posts instead.
Thanks in advance
Scotty
|
|
|
|
Re: How to cut a post in place.
#6500
02/06/07 12:36 AM
|
Joined: Dec 2005
Posts: 574
Timber Goddess
Member
|
|
Member
Joined: Dec 2005
Posts: 574 |
|
|
|
|
Re: How to cut a post in place.
#6502
02/06/07 12:38 AM
|
Joined: May 2002
Posts: 447
Will Truax
Member
|
|
Member
Joined: May 2002
Posts: 447 |
Ok, I'll bite,
What problem is it that you see with fixing a carpentry problem,
with carpentry ?
|
|
|
|
Re: How to cut a post in place.
#6503
02/06/07 12:39 AM
|
Joined: Dec 2005
Posts: 574
Timber Goddess
Member
|
|
Member
Joined: Dec 2005
Posts: 574 |
Well, I'm glad someone actually did it...cause I think it's a great skill to know.
And now we know!
Yay.
|
|
|
|
Re: How to cut a post in place.
#6507
02/06/07 01:24 AM
|
Joined: Dec 2005
Posts: 574
Timber Goddess
Member
|
|
Member
Joined: Dec 2005
Posts: 574 |
So what would you suggest instead?
|
|
|
|
Re: How to cut a post in place.
#6509
02/06/07 03:25 AM
|
Joined: Apr 1999
Posts: 245
Tom Cundiff
Member
|
|
Member
Joined: Apr 1999
Posts: 245 |
I don't like the idea of bolts that could draw moisture / condensation and cause rot or nasty black stains. Scarf joints are not that hard to cut. If the clients are to cheap to pay for quality joinery, I don't want to work for them anyway.
Not all who wander are lost.
|
|
|
|
Re: How to cut a post in place.
#6510
02/06/07 04:55 AM
|
Joined: Mar 2002
Posts: 1,687
Jim Rogers
OP
Member
|
|
OP
Member
Joined: Mar 2002
Posts: 1,687 |
Originally posted by Derek J Swanger: Originally posted by Will Truax:
[b]Ok, I'll bite,
What problem is it that you see with fixing a carpentry problem,
with carpentry ?
Problem: Rotted post bottoms.
Solution: Fix with carpentry
I got no problem here. I solve every problem with carpentry 
It's the how to fix with carpentry. I might have some problems with.[/b]So tell us, oh great timber framing master...... Tell us how to fix these rotten post bottom...... Tell us how the great and all knowing timber framer of Montana would fix them.......
Whatever you do, have fun doing it!
|
|
|
|
Re: How to cut a post in place.
#6513
02/06/07 05:19 AM
|
Joined: Mar 2002
Posts: 1,687
Jim Rogers
OP
Member
|
|
OP
Member
Joined: Mar 2002
Posts: 1,687 |
When you are trying to repair a structure there are some rules to the restoration process that we here in the northeast use.
I can't speak for others but only for what I've been taught by the men who do it everyday from a very well known and respected restoration company.
One rule is to try as best you can to save as much of the historic fabric as you can.
Why would you cut away more than needed anyhow?
It would be just more work.
Every restoration job should include keeping the water out when it's done, of course that goes without saying.
Some restoration jobs rules are that you only repair what is there to the same type, size, and style of what was there when it was first built.
Sometimes we see things that we'd do differently now, but if we're restoring then we restore was was there, not improve the way it was constructed.
If we improve it then we are not restoring it, we're improving it. And this changes the character of the original structure.
These are all things that we have to weigh and see what we need to do, want to do, or should do. It sometimes depends on what the customer wants, depending on the intended future use of the building.
Some people don't care if it is truly the "same" as it was. And therefore you don't have to do it the same as the first framer did.
Scotty, if you want to add scarfs to the bottom of your post to make it taller, for your workshop, then I don't see any problem with you doing that.
As long as it is done correctly and that means that each post's new bottom is secured to some part of the foundation to prevent it from moving should any outside force, like wind, be present.
If your frame is stable then there shouldn't be a lot of thrust at the post base. And if there is any then the proper joint and pegs should be used to resist this thrust. And if it's secured to the foundation you'll probably overcome that thrust anyhow.
Hopefully you'll be able to create the workshop you want.....
Jim Rogers
Whatever you do, have fun doing it!
|
|
|
|
Re: How to cut a post in place.
#6514
02/06/07 09:52 AM
|
Joined: Mar 2002
Posts: 961
Ken Hume
Member
|
|
Member
Joined: Mar 2002
Posts: 961 |
Hi,
I like the way that Derek challenges everyone hard on important issues to which there are probably no right or wrong answers.
Based on hard fact STUFF observation I would comment as follows :-
In domestic buildings the process of repair to an "as like" previous condition is rarely seen. Most interventions are made using an approach or with materials that are quite different from the original. If the original approach failed why should this process be repeated ? For example, when sills rot out in a cottage then it might be righted and then simply underbuilt in brick now relying instead on support from mid (chair) rails. Sometimes (but rarely) a new sill will be seen to be inserted at a higher elevation cutting off rotted post bottoms and making new tenons in remaining sound material. This can be seen at the original Pembroke Cottage in Hampshire where the front sill is now 10" higher than the rear. A replica of this cottage was built by Tom Musco several years ago and now stands in Royalston, Mass. and thus one option to preserve a building pattern might not be to repair the old but to simply build a new one.
In "open" buildings like barns where there is little supplementary stiffening or support to be gained from infill walls then the problems of righting leaning buildings is much more complex to resolve. I observed a leaning barn close to home being righted and repaired by a world renowned carpenter (yes you know him Will !) where a complete long wall had short stub scarfed additions made to post and wall stud bottoms. My thoughts on seing this were exactly as per Derek i.e. that there is now a plane of weakness here that might or might not survive a gale. What was previously failing in a slow yielding fashion might now succumb to a catastrophic failure.
I agree with Tom Cundiff's observations about metal connectors but in reality this is probably the most common repair method adopted in old buildings - especially the use of worn down wrought iron cart tyre strakes which do a marvelous job of reinforcing the English Tying joint. Up to 50% of English timber buildings now feature this now historic but quite dissimilar material repair or reinforcement method.
I have seen conservation award winning buildings where badly detriorated beams have been filled with a patchwork quilt of repairs that demonstrated the carpenters prowess but left the heart sinking in despair over the visual impact of the finished piece. Old and new don't seem to sit well together. Over enthusiastic repairs can and does result in "delisting" or downgrading listings of important historic buildings, once again made by timber frame conservation specialist of such standing and world renown that would make your jaw drop.
This week I spent some time at Farnham Castle and observed that an ancient carved capital aisle post is all that remains of a Norman hall (circa 1100's) with the whole hall building having now effectively morphed into something completely different now made mainly from brick and stone. It would clearly not be practical to rebuild the former hall on its current site but it just might be possible to survey and collect enough fragmentary design information about the old timber hall to recreate this hall in virtual space by judicious employment of CAD or other visualization techniques.
The renaisssance of "intensive" repair of timber buildings being seen today is not new. Oft times a complete new front will have been applied to a building possibly to transform its appearance or simply to make good a previously failed or badly deteriorated wall. Is this right or wrong ?
It is worth taking the opportunity to remind ourselves that the timber frame wonder of the world - Westminster Hall hammer beam roof is not the original roof with the previous aisled hall (a bit like Farnham Castle) having served for 250 years before being torn down and replaced with a new superimproved model (incidentally made in Farnham, Surrey).
We do what we can given the constraints that exist but please don't let anyone fool you into thinking that there is a right or wrong way to do anything. Shutting down the brain and following a prescriptive rule book is not the answer.
I don't think that we have yet reached Derek's "50 ways to leave a lover" but the strength of this forum appears to lie in the challenging and informative contributions made by all.
Regards
Ken Hume
Looking back to see the way ahead !
|
|
|
|
Re: How to cut a post in place.
#6516
02/06/07 11:52 AM
|
Joined: Mar 2002
Posts: 1,687
Jim Rogers
OP
Member
|
|
OP
Member
Joined: Mar 2002
Posts: 1,687 |
That's ok Derek, we'll discuss it further on the Forestry Forum..........
Whatever you do, have fun doing it!
|
|
|
|
Re: How to cut a post in place.
#6517
02/06/07 12:07 PM
|
Joined: Jan 2007
Posts: 71
Timbo
Member
|
|
Member
Joined: Jan 2007
Posts: 71 |
I've tried to be diplomatic ,but honestly scarfed extentions for raising a building? A new post could be fashioned and installed ( and would be a better repair) . Scarfs are not difficult, but they are complicated and time consuming, and mentioned earlier some customers could care less about a masterpiece of joinery hidden in their wall. Seriously I'm interested in how you would cut the joint. Not where but what tools you would use to get 4 surfaces(that will be in compression) to align perfectly without shims? We do quite a bit of work for historic preservatiion here in NY and they indeed do want to preserve historic fabric, they are not cheap and indorse the bolted lap joint. I'm trying to find some photos of some sheared scarf joints, they do split if loads aren,t distributed correctly. I would not recommend scarfed joints as a normal post repairs. We don,t usually have the luxuarry of choosing every client, ya gotta eat. The're still great scarfs.
Timothy W Longmore
|
|
|
|
Re: How to cut a post in place.
#6518
02/06/07 03:45 PM
|
Joined: Apr 1999
Posts: 245
Tom Cundiff
Member
|
|
Member
Joined: Apr 1999
Posts: 245 |
I have scarfed post bottom repairs on several occasions, I have even done so while working for a timberframer who was also an engineer. In most cases I have been able to do the cutting on the post when the frame is disassembled for relocation. The router jig method mentioned by Scott McClure works very well, and can be followed by a chain saw using EDM tracer guides as well. Moisture problems can be reduced by coating both halves of the scarf with end sealer before final assembly. I realize that most clients have a limited budget. Compared to the cost of stainless steel hardware, joinery solutions are a reasonable option. Tom  Note, I did not use templates or a jig to cut these two scarfs, the center post was replaced (it's easier to cut a tenon than a scarf) Tom
Not all who wander are lost.
|
|
|
|
Re: How to cut a post in place.
#6519
02/07/07 01:27 AM
|
Joined: Jan 2007
Posts: 71
Timbo
Member
|
|
Member
Joined: Jan 2007
Posts: 71 |
Thanks for info Tom , I use chainsaw for quite alot of my joinery too. I usually try to cut a shallow kerf with the circular saw first. That sometimes seems to be the hardest and most dangerous part of the procces. I've also used slabbing mills for some of the work on the splints. We've also used circ. saw and finished with recip. but lining up the circ. saw kerfs was kind of hit or miss due to surface irregularities. I like to treat all end grain on repairs too , we use clear poly stain.
Timothy W Longmore
|
|
|
|
Re: How to cut a post in place.
#6521
02/08/07 12:44 AM
|
Joined: Mar 2002
Posts: 1,687
Jim Rogers
OP
Member
|
|
OP
Member
Joined: Mar 2002
Posts: 1,687 |
I do welcome comments... including yours Derek...
When they have some value....
But when you say you know 50 ways that are better and then won't share any....
I have to conclude it's just a lot of hot air.....
Timber Goddess asked me for a "how it is done" story, and I posted it.
I did a search once, of your latest posts, of the last fifty I could see only three were offering any advice, and most of them you stated to ask someone else with more knowledge then the poster.......
Until you post something of any value, I have to assume you're here as a social club, at best.....
I've proved my willingness to help others, and you say you've got game........
Jim Rogers
Whatever you do, have fun doing it!
|
|
|
|
Re: How to cut a post in place.
#6524
02/08/07 01:26 PM
|
Joined: Nov 2003
Posts: 687
Gabel
Member
|
|
Member
Joined: Nov 2003
Posts: 687 |
Alright, guys take it outside.
|
|
|
|
Re: How to cut a post in place.
#6525
02/09/07 09:24 PM
|
Joined: Nov 2003
Posts: 1,124
Mark Davidson
Member
|
|
Member
Joined: Nov 2003
Posts: 1,124 |
oh, I don't know Gabel. It's not bad entertainment actually. I mean, I sat in front of the TV last night for a couple of hours and got less chuckles than I did from reading this thread through.... I like the fact that, so far, this forum stays open to all the posts that come in and therefore folks can read through and take what information they like away.. In this thread I found myself going back to Ken Hume's post to read again. Repair can be a tough task and I know that sinking feeling when you've already spent money working for someone and you find yet another rotten piece of wood....
|
|
|
|
Re: How to cut a post in place.
#6526
02/09/07 09:55 PM
|
Joined: Apr 1999
Posts: 245
Tom Cundiff
Member
|
|
Member
Joined: Apr 1999
Posts: 245 |
Originally posted by Ken Hume:
I don't think that we have yet reached Derek's "50 ways to leave a lover" but the strength of this forum appears to lie in the challenging and informative contributions made by all. I've got to get my hearing checked, I always thought that was, "50 ways to load your lumber" You know, "Just make a new stack, Jack" "Go buy a new toy, Roy" "Better look at the plan, Stan" "Plant a new tree, Lee"...... :p
Not all who wander are lost.
|
|
|
|
Re: How to cut a post in place.
#6527
02/09/07 11:15 PM
|
Joined: Oct 1999
Posts: 463
Roger Nair
Member
|
|
Member
Joined: Oct 1999
Posts: 463 |
I'm with Gabel, bragging, taunting, and insulting leads to no good, disagreements can be civil and valuable. Remember this forum should or could be read by school kids. So keep it clean and fair. If you think or need otherwise seek out or sponsor Bad Mojo's Virtual Wild West Saloon, a place where anything goes.
|
|
|
|
Re: How to cut a post in place.
#6528
02/10/07 07:05 AM
|
Joined: Dec 2005
Posts: 574
Timber Goddess
Member
|
|
Member
Joined: Dec 2005
Posts: 574 |
...At least I learned how to cut a post in place.... :rolleyes:
|
|
|
|
Re: How to cut a post in place.
#6529
02/15/07 07:50 PM
|
Joined: Mar 2002
Posts: 344
Joel McCarty
Member
|
|
Member
Joined: Mar 2002
Posts: 344 |
|
|
|
|
|