How to Cut a Post in Place by Jim Rogers 11/10/06
When restoring a structure that has some rotten post bottoms it is sometimes necessary to cut off the rotten end and replace it with a new post bottom, to support the structure at the sill.
First you have to temporarily support the structure so this work can be done. You should relieve all weight off the post and it has to be securely supported.
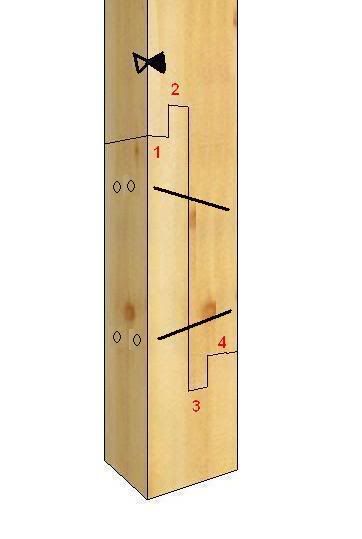
Next, you’ll need to identify which face of the post is the layout face and which will be the adjacent face. In the drawing below the reference face is labeled with a triangle that has been colored in solid black.
This triangle points to one edge of the timber which is the reference edge.
The adjacent face is also labeled with a triangle pointing to the reference edge and this triangle is not colored in. It is known as the open triangle. All measurement will be drawn from the reference edge.
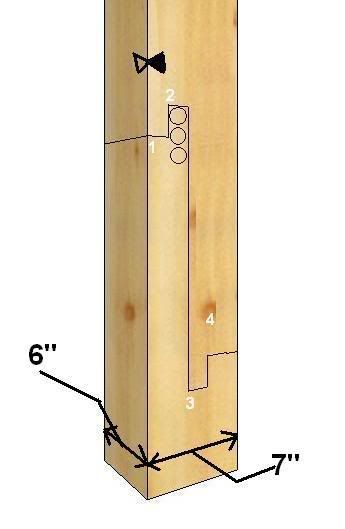
In this example the post is not square. It is a 6"x 7" post, as shown below:
The scarf joint being used in this example is known as a bladed scarf joint. To lay it out on your post you’ll need to divide the post into four equal sections, if possible. Each section will either have one part of the blade or its mating mortise. With this post we chose to use a section dimension of one and one half inches. And the extra inch was left on the face opposite the adjacent face. This made the framing square the tool for layout, as the tongue of the framing square is one and one half inches wide. These four sections are labeled one through four in the above drawing.
In laying out a bladed scarf joint there are two short tenons that are called the short overlap, and then there is the long overlap. In this example we used eighteen inches as the distance of the long overlap. One “rule of thumb” is that the long overlap should be three or four times the thickness of the piece. Six inches times three equals eighteen inches.
The short overlap in this example was three inches but the standard is usually two inches.
The layout if this scarf has to be located above where the rot is and needs to be cut into “good” wood. And it is usually preferred that the side of the post toward the inside of the building have the long overlap to preserve the most original fabric on the visible side.
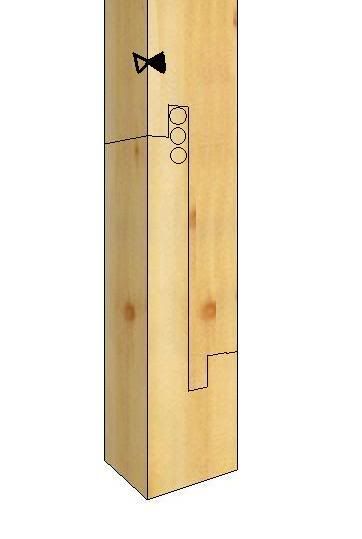
The entire layout should be drawn on both the reference face and the face opposite the reference face, with lines connecting the cuts drawn on the adjacent face and the face opposite the adjacent face.
Each of these cut lines should be scribed with a knife to score the fibers of the timber.
After scribing the lines, two or three holes should be laid out and bored into the upper portion of the long overlap mortise, from the two opposing sides. As shown in the drawing above.
When the holes have been bored through so that they intersect in the middle of the post then you can begin cutting away the waste wood to create this joint.
The first cut to make is the end cut as shown in the drawing below in red:
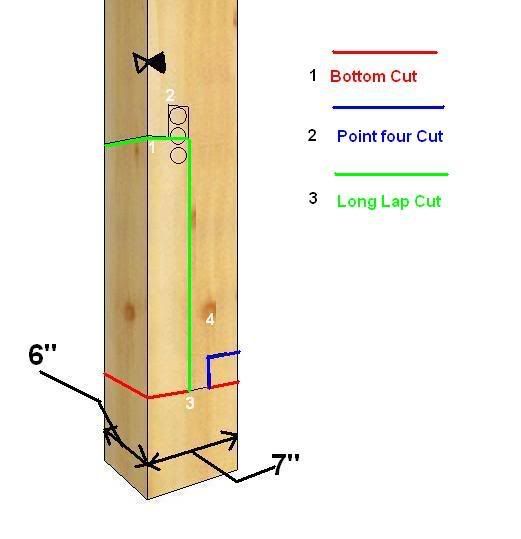
This will create the end of section number three.
The second cut can be made to create section number four, sizing the short overlap to the desired dimension, in this case one and one half inches. Shown above as the blue line.
The next cut to make is the green cut line, which is the long lap cut, creating end number one.
After this cut is made, the section number two can be chiseled out. During this chiseling the section number one is sized to the desired dimension, again in this case one and one half inches.
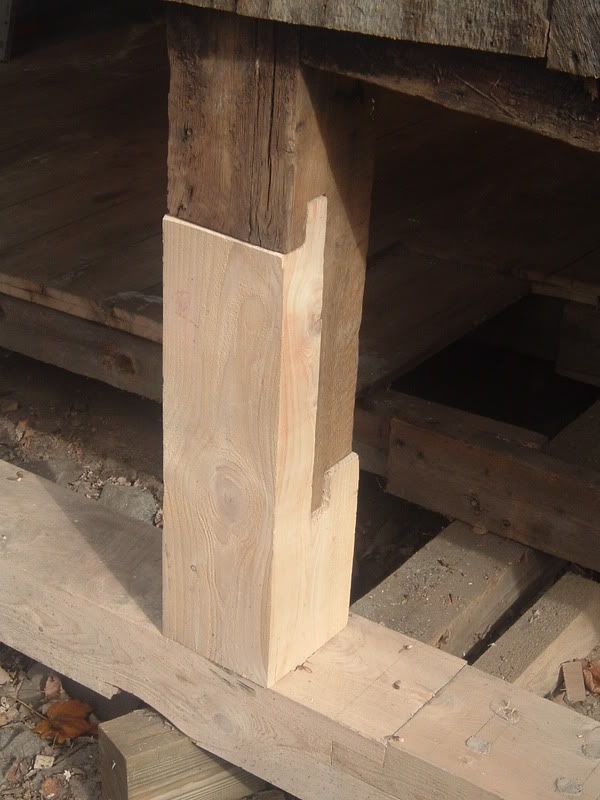
When done the post should look like this:

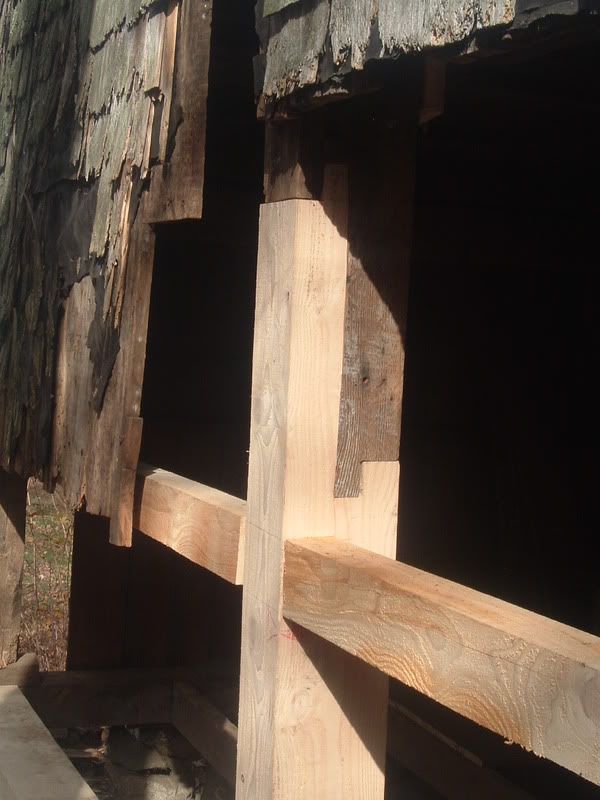
Here are some examples of this joint and its matting repair piece in place:
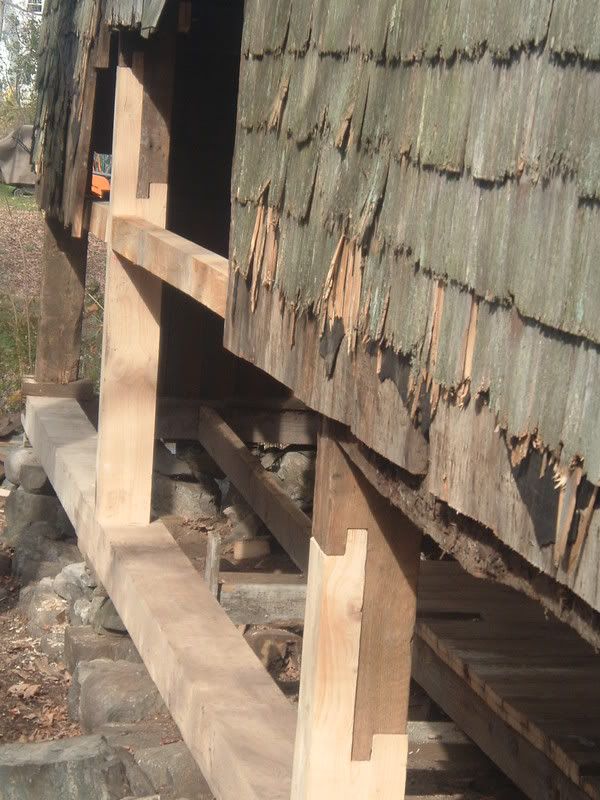
And:
Also:
In order to make this joint work correctly and support the load of the building you have to fit the original post to the repair piece so that all four points/section touch at the same time.
These four points of connect are shown here:

When we first cut the repair piece, we cut near the scribed line, but not on the scribed line, so that the piece is just a little too big. This is called “leaving the line.” Then as we fit these two pieces together we slowly trim each of these pieces to the line and continuously test fit them together until they mate. In this example these are the vertical cut lines. Then once it fits together with the vertical cut lines trimmed; we then go to the trimming of the horizontal cut lines that make the four points of contact.
To fit the repair piece to the original post, and make all four points of contact connect or touch you have to trim the longest point back until the second longest one touches also. By the longest point, I don’t mean point number three, I mean the first point that touches when the repair piece and the post are assembled.
Once you have trimmed either of the pieces so that the first and second longest points touch, you then trim both of them until the third longest point touches.
After you have trimmed the two longest points so that now three points are in contact, you trim all these three points until the fourth point is in contact.
This trimming may only involve trimming off a saw cut, or half a saw cut.
You may have to assemble and disassemble this repair piece to the post several times to get it to fit.
I hope this has helped you to understand how to cut and repair a post in place.
Questions and comments are welcome.
Jim Rogers